The Extraordinary Flora Bundle is such an amazing die and stamp set, especially when paired with the Extraordinary Flora Washi tape! The stamp set has one large stamp with sixteen flowers and leaves, plus four other stamps (three sentiments and dashed lines). The die will cut out all the flowers/leaves with one pass and it's small enough to fit in the Mini Sampin' Cut & Emboss machine! The Washi tape has flowers/leaves in two different color palettes - one with pinks and purples and the other in corals and reds. As soon as I started using these products, I was hooked - I think you will be too!
When applying the washi tape to cardstock, you will need about 3-1/4" x 5-1/2", but as I show in the video, I used a 3-1/2" x 11" piece of Basic White and added two "sections" at the same time. I like having a little extra room when I'm working with such a long piece. When I first started playing with it, I only put it on white. Then I tried it on light colored Two-Tone cardstock (I show Pool Party and Darling Duckling in the video), but you could try Very Vanilla, Bubble Bath, Lemon Lolly, Soft Sea Foam... well, you get the picture!
Gather your supplies:- Cardstock: Pool Party 8-1/2" x 5-1/2"; Basic White 4" x 5-1/4"; Subtles 6" x 6" DSP (Pool Party pattern) 4" x 5-1/4"; Pool Party Two Tone Cardstock 3-1/4" x 5-1/2"
- Bundle: Extraordinary Flora (and the Extraordinary Flora Washi Tape)
- Stamp: Layers of Beauty
- Inks: Pretty Peacock and Pool Party
- Embellishment: Iridescent Pearls Basic Jewels
- Adhesive and Tools
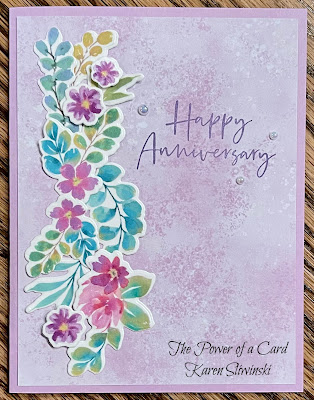
Adhere the washi tape (the pinks/purples segment) to the Pool Party Two-Tone cardstock, and cut out with the die. Arrange the flowers and leaves along the left side of the Subtles DSP. Feel free to play and move pieces around until you get the arrangement you like. Then start adhering the pieces - I found it easiest to use Mini Glue Dots and just set them down without pressing too hard so that they could be moved if necessary. For the three individual flowers, I used Mini Dimensionals to add these and give more lift to the swag. Once the greenery is in place, stamp the anniversary sentiment in Pretty Peacock, then add this to the card base which has been folded in half and pressed with the bone folder.
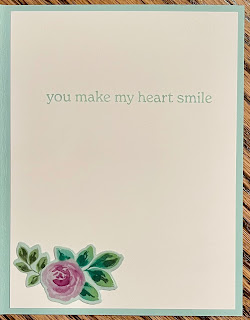
For the inside of the card, stamp the interior sentiment in Pool Party ink and decorate the corner with a few more flowers. Adhere this panel with glue and add a few pearls to the card front. I added some more flowers to the corner of the envelope too - just make sure you spread the glue all over the back so it won't come off when it goes through the postal machines. My second card with this layout was done on Basic White and paired with Fresh Freesia (I said Highland Heather in the
video, but the that was only ink color of the Happy Anniversary) - which version do you like better?
My next card was done on Darling Duckling Two-Tone cardstock. I was a little worried that it would be too dark, but it wasn't! I cut two ovals from the Framed Scenes dies and made a spray of flowers on the top above my sympathy sentiment (from Unbounded Love). For the backdrop, I used the Glass & Gardens embossing folder on a piece of Darling Duckling. Then I fussy cut the edge to make a stunning border against the white card base. I think the final card turned out perfectly and I love the warmth of the colors together!
For my next one, I just stamped the flowers/leaves in Secret Sea on white. I used my Wink of Stella to add a little sparkle to the flowers. If you do this soon after stamping, you'll pick up a tiny bit of the ink and get a hint of blue in the petals. I used the Stylish Shapes to cut out a circle, which was placed on a panel of Secret Sea that was embossed with the Glass & Gardens in the center. I popped up the sentiment and completed the inside with Congratulations and a few more flowers. What a lovely wedding card!
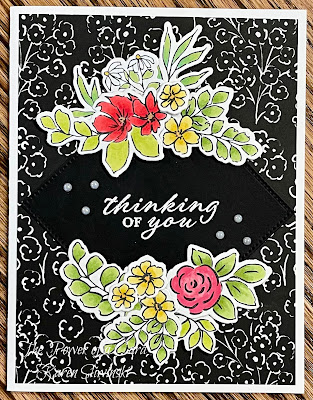
My flowers for this card were stamped in black and a few were colored with Stampin' Blends. I used the two smallest squares from Stylish Shapes to cut squares in Basic Black and Highland Heather, alternating the arrangement. I added a small mat of Basic White on the smallest die cut square before adding them on point with the larger square. Before adding them to the white panel, I embossed some diagonal lines using a score board and my Take Your Pick tool. My sentiments are from Blooming Phrases and The Right Words.
More coloring with Blends on this card! I used a background of the Mixed Media Florals DSP and another square from the Stylish Shapes, set on point the middle. I embossed my sentiment from Wonderful Thoughts in white on the black square. I arranged two sprays of flowers top and bottom and finished off with more of the Iridescent pearls.
This next card is one of my favorites! It is so simple in design, yet so stunning. I embossed a diagonal panel of Strawberry Slush with the Exposed Brick embossing folder and adhered it to my card base. Then I punched out a circle, stamped "for you" and added a small spray of flowers. The Strawberry Slush and Pretty in Pink Gems add the final touch. The sentiments are from Tags of Thanks and Simply Said. I liked this one so much that is is one of the cards in my monthly card class.
The natural curve of the flowers and leaves really fit so nicely as sprays around circles and here is another example. I cut a circle out of the beautiful Irresistible Designs Specialty DSP and matted it with Strawberry Slush. The embossed pattern on that paper is subtle and might be hard to see, but is leaves on a vine. The Greetings for All Mix & Match Ephemera pack (a wonderful source of a variety of sentiments) provided my sentiment and was placed in the middle of the opening and the flowers were added to surround it.
I'm finishing up my samples with one last circle - this time it's cut from DSP (Floral Impressions) instead of plain cardstock. I used the other embossing folder from the Glass & Gardens pack to emboss the white panel. I stamped my Congratulations on a strip of white, then cut it out with the same die (Stylish Shapes) so that it would have the stitching along the edge to align with the circle. I glued this down before adding my spray of flowers.
I have made lots and lots of flowers and there are still so many left on the roll! I keep the extra ones in a plastic folder that the die came in to use later. You'll be able to get so much enjoyment from this bundle and I hope you love it as much as I do!
Karen
ThePowerOfACard@gmail.com
Etsy Shop: The Power of a Card
Shop my Store!
https://ThePowerOfACard.blogspot.com
Images Copyright Stampin’ Up!®
Find me on Facebook - The Power of a Card or
Join my Facebook Group (The Power of a Cardmaker): https://www.facebook.com/groups/1042676296088278/?ref=share
The new rewards program is here! For any purchase above $20, you will earn 10% in rewards to spend on a future purchase. And you don’t have to use them all at once as you can save up rewards to get something big for free! If you don’t have an on-line account with me as your demonstrator, please go to my store and get one.
Product List


![Sunshine Vibes Bundle (English) [ 165152 ] Sunshine Vibes Bundle (English) [ 165152 ]](https://assets1.tamsnetwork.com/images/EC042017NF/165152s.jpg)
![Basic White 8 1/2" X 11" Thick Cardstock [ 159229 ] Basic White 8 1/2" X 11" Thick Cardstock [ 159229 ]](https://assets1.tamsnetwork.com/images/EC042017NF/159229s.jpg)
![Basic White 8 1/2" X 11" Cardstock [ 166780 ] Basic White 8 1/2" X 11" Cardstock [ 166780 ]](https://assets1.tamsnetwork.com/images/EC042017NF/166780s.jpg)
![Strawberry Slush 8 1/2" X 11" Cardstock [ 165625 ] Strawberry Slush 8 1/2" X 11" Cardstock [ 165625 ]](https://assets1.tamsnetwork.com/images/EC042017NF/165625s.jpg)
![Florals In Bloom 12" X 12" (30.5 X 30.5 Cm) Designer Series Paper [ 165175 ] Florals In Bloom 12" X 12" (30.5 X 30.5 Cm) Designer Series Paper [ 165175 ]](https://assets1.tamsnetwork.com/images/EC042017NF/165175s.jpg)
![Strawberry Slush Classic Stampin' Pad [ 165286 ] Strawberry Slush Classic Stampin' Pad [ 165286 ]](https://assets1.tamsnetwork.com/images/EC042017NF/165286s.jpg)
![Daffodil Delight Classic Stampin' Pad [ 147094 ] Daffodil Delight Classic Stampin' Pad [ 147094 ]](https://assets1.tamsnetwork.com/images/EC042017NF/147094s.jpg)
![Baker's Twine Essentials Pack [ 155475 ] Baker's Twine Essentials Pack [ 155475 ]](https://assets1.tamsnetwork.com/images/EC042017NF/155475s.jpg)
![Mini Glue Dots [ 103683 ] Mini Glue Dots [ 103683 ]](https://assets1.tamsnetwork.com/images/EC042017NF/103683s.jpg)
![Stampin' Dimensionals [ 104430 ] Stampin' Dimensionals [ 104430 ]](https://assets1.tamsnetwork.com/images/EC042017NF/104430s.jpg)
![Multipurpose Liquid Glue [ 110755 ] Multipurpose Liquid Glue [ 110755 ]](https://assets1.tamsnetwork.com/images/EC042017NF/110755s.jpg)
![Paper Trimmer [ 152392 ] Paper Trimmer [ 152392 ]](https://assets1.tamsnetwork.com/images/EC042017NF/152392s.jpg)
![Stampin' Cut & Emboss Machine [ 149653 ] Stampin' Cut & Emboss Machine [ 149653 ]](https://assets1.tamsnetwork.com/images/EC042017NF/149653s.jpg)


![Extraordinary Flora Bundle (English) [ 165245 ] Extraordinary Flora Bundle (English) [ 165245 ]](https://assets1.tamsnetwork.com/images/EC042017NF/165245s.jpg)
![Extraordinary Flora Washi Tape [ 165269 ] Extraordinary Flora Washi Tape [ 165269 ]](https://assets1.tamsnetwork.com/images/EC042017NF/165269s.jpg)
![Layers Of Beauty Photopolymer Stamp Set (English) [ 163514 ] Layers Of Beauty Photopolymer Stamp Set (English) [ 163514 ]](https://assets1.tamsnetwork.com/images/EC042017NF/163514s.jpg)
![Pool Party 8-1/2" X 11" Cardstock [ 122924 ] Pool Party 8-1/2" X 11" Cardstock [ 122924 ]](https://assets1.tamsnetwork.com/images/EC042017NF/122924s.jpg)
![Pool Party 12" X 12" (30.5 X 30.5 Cm) Two Tone Cardstock [ 166691 ] Pool Party 12" X 12" (30.5 X 30.5 Cm) Two Tone Cardstock [ 166691 ]](https://assets1.tamsnetwork.com/images/EC042017NF/166691s.jpg)
![Subtles 6" X 6" (15.2 X 15.2 Cm) Designer Series Paper [ 165306 ] Subtles 6" X 6" (15.2 X 15.2 Cm) Designer Series Paper [ 165306 ]](https://assets1.tamsnetwork.com/images/EC042017NF/165306s.jpg)
![Pretty Peacock Classic Stampin’ Pad [ 150083 ] Pretty Peacock Classic Stampin’ Pad [ 150083 ]](https://assets1.tamsnetwork.com/images/EC042017NF/150083s.jpg)
![Pool Party Classic Stampin' Pad [ 147107 ] Pool Party Classic Stampin' Pad [ 147107 ]](https://assets1.tamsnetwork.com/images/EC042017NF/147107s.jpg)
![Iridescent Pearl Basic Jewels [ 158987 ] Iridescent Pearl Basic Jewels [ 158987 ]](https://assets1.tamsnetwork.com/images/EC042017NF/158987s.jpg)
![Mini Stampin' Dimensionals [ 144108 ] Mini Stampin' Dimensionals [ 144108 ]](https://assets1.tamsnetwork.com/images/EC042017NF/144108s.jpg)