Wednesday, April 29, 2020

Best Dressed One Sheet Wonder

I recently participated in a card making retreat where we learned how to make five cards with one sheet of 6" Designer Series Paper (DSP).  This is a fabulous way to make beautifully simple cards with minimal materials and time!  So I decided to design my own cutting diagram and show you how to do it too!

Gather your supplies:
Thick Whisper White Cardstock:
     (3) 8-1/2" x 5-1/2", folded in half and burnished
     (2) 4-1/4" x 11", scored at 5-1/2", folded in half and burnished
          (for one of them, score at 2-3/4" too)
Whisper White Cardstock:
     4" x 5-1/5"
     Scraps for sentiments
6" x 6" DSP
Coordinating color of Cardstock:
     3-1/4" x 11"
     1-1/2" x 5-1/2"
Stamp set with sentiments
Ink pad (I used the same color as my coordinating cardstock)
Multipurpose Glue
Stampin' Dimensionals
Trimmer

Watch the video now:  https://youtu.be/Kv2LbtKHo20

Step 1:
Prepare all of your card bases.  For one of the 4-1/4" x 11" pieces, fold at the second score line to make a Z fold card.

Step 2:
Cut your 6" square of DSP according to the chart.  First cut in half.  Then take one half and cut it in half again so you have a 3" x 3" square.  Take one of these squares and cut in half diagonally and the other vertically. Take the remaining 3" x 6" piece and cut it at 4" (leaving a  2" x 3" and 4" x 3").


Step 3:
Cut your mats.  Using the long strip of coordinating cardstock, cut at at 2-1/4", 4-1/4", and two 1-3/4".  This will leave you with a one inch leftover. (During the filming, I made one cut wrong - my apologies!  I corrected it as I assembled the pieces, but want to make sure you have the correct cuts here.) Adhere the DSP to their mats.


Card 1:
Adhere the 1-1/2" x 5-1/2" strip to the left side, leaving a small gap, then pop up the triangle piece with dimensionals.  Stamp your sentiment in the lower right corner.


Card 2:
This is the Z fold card. With the card folded, adhere the DSP to the center of the card, making sure you only put glue on the left half of the DSP.  Stamp your sentiment and trim to size.  Add it to the center of the DSP with dimensionals.


Card 3:
Adhere the large rectangle to the card base in the center.  Stamp your sentiment on a small strip, flag the ends if desired and pop this up with dimensionals in the center.


Card 4:
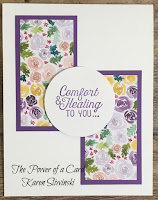
Adhere the two small rectangles in the top left and bottom right.  Stamp your sentiment and cut with a circle punch (or other punch, or even keep it as a square). Add dimensionals and place it in the center of the card.


Card 5:
Take the remaining triangle piece and cut it into three 1" segments.  Add the white layering piece to your card base with dimensionals.  Add the three DSP segments as shown, using dimensionals.  Stamp your sentiment and cut with a circle punch, adding it to the lower right corner with dimensionals.


Some ways to step it up just a little:
Emboss the colored strip in card 1 and the layering white piece in card 5.
Add more layers - either with a 2-1/4" circle punch (oops - I called it a 2-1/2" punch on the video!) or by adding another color cardstock cut at 1/4" larger than the mat.
Use punches for your sentiments.
Use a colored cardstock as your base instead of white - then you can use white to mat your DSP.


Remember - one way patterns are only a problem with the first card layout - it's just something to think about when picking your DSP.  It's quite easy to find paper and make cards for the guys in your life - we have plenty of paper that isn't a floral or feminine!


I hope you will give this One Sheet Wonder a Try - It's fun, fast and fabulous!

Karen

ThePowerOfACard@gmail.com
Etsy Shop: The Power of a Card
https://karensliwinski.stampinup.net 


Product List

Friday, April 24, 2020

Inspiring Iris Card Class

As promised, I am offering my first on-line card class.  There are five beautiful cards made with the Inspiring Iris stamp set and cardstock and ink from the Brights collection of colors.


I hope you will be able to join me (and invite a friend or two) to this quarantine approved class!

Karen

ThePowerOfACard@gmail.com
Etsy Shop: The Power of a Card
https://karensliwinski.stampinup.net


Product List
Basic Supplies You Probably Have (but maybe need)

Monday, April 20, 2020

Memories and More - so Much More!


If you watched my first video, you learned that I got a new floor in my stamping room (it's the backdrop for these photos) and that while I was in the process of getting it installed, I was working on making cards with leftover bit and pieces.  Now that I am back in my room, I am still trying to use leftover supplies and turn them into cards.  I had a Memories & More card pack from a few years ago that still had a lot of pieces unused.  So I got to work!  I made over 25 cards (not all shown here) and still have materials to use!


A Memories & More card pack has a variety of options that are all themed around a stamp set.  Depending on which pack you choose, you may have large printed cards, die cuts, stickers, envelopes, and smaller printed cards.  The printed cards will be double sided, giving you plenty of options.


Add some solid color cardstock and a few sentiments and you can quickly make so many cards!  You can even add a ribbon, color your stickers with blends, or use an embossing folder for added interest.  Let your imagination soar - you may just be surprised at the ease of using this pack - and for only $11, it is a real bargain!
Check out the current Memories & More packs below.

Karen


ThePowerOfACard@gmail.com
Etsy Shop: The Power of a Card
https://karensliwinski.stampinup.net 


Product List

Thursday, April 16, 2020

I Miss You - My First Video!

As promised, I will be posting videos here for you to enjoy.  I wanted to make a simple card using tools and supplies I think most of you have.  The card can be made using any color card base - just choose something that will coordinate with your die cut images or stamps.


Gather your supplies:
Crumb Cake Cardstock: 8-1/2" x 5-1/2" and 3-3/4" x 5"
Whisper White Cardstock: 4" x 5-1/4" and a strip approximately 1/2" wide
Granny Apple Green: scrap big enough to cut your die cut images
Ink Pads: Granny Apple Green and Pear Pizzazz
Stamp Sets: Label Me Bold and Itty Bitty Greetings
Die Set: Tropical
Other Supplies:  Dimensionals (both mini and regular size), multipurpose glue, trimmer and triple banner punch

Fold your card base in half and burnish.

Using your trimmer and the scoring blade, score the layering crumb cake piece at 1/4" and 3/8" along all four sides.

Cut your die cut pieces (taller, thinner images work best) - you will need four or five, depending on the width of the die cut piece.  Using the background stamp and Pear Pizzazz ink, add "texture" to your die cuts.

Arrange your die cuts in the center portion of the crumb cake layering piece and when you are satisfied with it, glue them down.

Stamp your sentiment onto the white strip and trim using the punch or scissors.

Adhere the sentiment on top of the layering piece that has the die cuts using mini dimensionals.  It is helpful to place the dimensionals in-between the die cut pieces as much as possible as shown in the video.

Adhere this layering piece onto your card base with dimensionals.

Glue another die cut to the inside white layer and add to the interior of the card.

You can tailor your sentiment and Itty Bitty Greetings is the perfect set to do that as it has 32 different sayings!

I love using background images to add texture to plain cardstock.  As I showed in the video, there are many sets you could use for this technique.  The ones I mentioned are: Gallery Grunge, Artisan Textures, Beautiful Friendship, Geared Up Garage and Painted Poppies.

Here is the Video I Miss You

This is the inspirational piece behind the video.  I just got new flooring in my stamp room and as I was waiting for it to be finished, I was cleaning up all the bits and pieces leftover from previous cards.  I challenged myself to turn these leftovers into cards and that's how this card came about.


I hope you enjoyed watching this video and in these days where we are all staying home (and healthy), were inspired to add something new to your card-making skills.

Handmade cards touch hearts.  Send one & experience The Power of a Card!

Karen


ThePowerOfACard@gmail.com
Etsy Shop: The Power of a Card
https://karensliwinski.stampinup.net


Product List
Super Sized Dotted Circles 3D Embossing Folder

Embossing folders have been around for many years, but each year, Stampin' Up! surprises me and comes out with new and unique folders!  ...