Sunday, May 31, 2020

Basic Z Fold - You Make the World a Better Place

Fun Fold cards look so cool, but also a little intimidating to a beginning stamper.  What I'm going to show you is a very simple Z fold and you will be surprised at just how easy it is to make.  I am featuring some products from our new annual catalog (which releases on June 3rd!!! Can you tell I'm excited??).  We are using items from the World of Good suite and one of the new in-colors, Misty Moonlight.  (This stamp pad is not listed in the product list below just yet - it will be added after the catalog is released.)

Gather your supplies:
Whisper white:

  • 5-1/2" x 8-1/2" scored at 2-1/8" and 4-1/4" (or just folded and burnished as I show in the video)
  • 4-1/8" x 5-3/8", embossed with the Subtle embossing folder
  • Scraps to die cut the globe and globe holder

Misty Moonlight:

  • 2" x 8-1/5" scored at 2-1/8" and 4-1/4"
  • Scraps to die cut the globe background and swirl

World of Good Specialty DSP

  • 4" x 5-3/8" (later cut into two pieces 2" x 5-3/8")

2020-2022 In-Color 6" DSP

  • 1-7/8" x 2"

Beautiful World Bundle (stamps and dies)
Misty Moonlight Stamp Pad
Wink of Stella
Multipurpose Glue

Begin by folding white card base in half, giving the crease a good press.  Then fold it back on itself so that the left side of your card is only a half panel wide.  Repeat with the Misty Moonlight strip.  Turn the blue strip over so your two Z folds look like this:


Now we can decorate the panels.  Starting with the white card base, adhere the embossed panel to the right side.  Cut the DSP paper in half and adhere them to the folded left side, keeping the pattern of the DSP aligned.  Stamp the sentiments on the blue panel as shown.


We are ready to combine the two Z folds to make our card.  Position the two pieces so that the blue piece is about 3/4" from the bottom.  Add glue to the underside of the blue panel ONLY on 2" of the leftmost side - you don't want glue to go beyond the crease of our card base.  Firmly hold in place (the panel goes all the way to the edge) until the glue sets.  Turn the card over and add glue to the underside of the blue panel but only on 2" of the rightmost side.  Hold the blue panel compressed, close the card and hold until the glue is set.  (Again, the blue panel goes to the edge.)

Adhere the globe to the background, then add the globe holder to the globe.  I added Wink of Stella to the globe holder for an extra touch of sparkle.  Once these pieces are assembled, add them to the front of your card at an angle.  The final piece is the swirl which is added to the upper right hand corner of the embossed white panel.

It's easy to change up the card layout by increasing the thickness of the blue strip to fit your stamps.  You can add a piece of DSP to decorate the front panel.  You can leave off the embossed panel if desired.  Experiment!  I've shown two more samples of the same card using different color schemes and DSP.  I hope you enjoy the world of Fun Folds!

Here is the video link:  https://www.youtube.com/watch?v=cN2iUOgDTTo


Karen

ThePowerOfACard@gmail.com
Etsy Shop: The Power of a Card
https://karensliwinski.stampinup.net 

My current host code is: HYHVGDTN  Please use this for orders less than $150 and you’ll get a special treat from me.  For orders over $150, you will qualify for host rewards from Stampin’ Up! (plus a treat from me!).

Product List

Friday, May 22, 2020

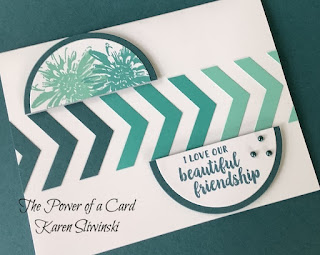
Friendship Chevrons

I like to show my customers how to get the most of out of their tools and this card does just that!  Here is another fun way to use the Banner Triple Punch - make chevrons and arrange them in a beautiful ombre pattern.


Gather your supplies:
Stamp Sets:  Beautiful Friendship and Positive Thoughts
Ink colors:  Pretty Peacock, Bermuda Bay and Coastal Cabana
Paper cutting and scoring:

  • Whisper White 8-1/2” x 5-1/2”, scored at 4-1/4”; 2-3/4” square

  • Pretty Peacock 1-1/2” x 4-1/4”, 3” square

  • Bermuda Bay 1-1/2” x 4-1/4” 

  • Pretty Peacock 1-1/2” x 4-1/4”

  • Any color scrap 5-1/2” x 1-3/8” to use as a placement     guide
  •  
    Other Tools:  Banner Triple Punch, Pearl Basic Jewels, Pretty Peacock Stampin' Blends, Layering Circles Dies, Die Cut machine

    Die cut the circles - use the second largest for the Pretty Peacock and third largest for the Whisper White.  Cut both circles in half.

    Stamp the flowers using Bermuda Bay and Coastal Cabana and the saying with Pretty Peacock. Adhere the white half circles to the Peacock half circles with glue.

    Cut chevrons by placing the cardstock strip into the punch and pushing all the way in.  Cut, then push all the way in again and repeat until you have four of each color.

    Use the scrap paper as a guide by placing it along the fold (you may even want to use a post-it to hold it in place).  Adhere one of the Bermuda Bay chevrons near the middle of the card along the edge of your guide.  Place another chevron next to it as a place holder (no glue!), and adhere chevrons to the right and left to complete the color pattern as shown.  Trim the chevrons that go off the sides of your card.

    Pop up the half circles using dimensionals above and below the row of chevrons.

    Use the dark Pretty Peacock blend to color three pearls and adhere them to the sentiment half circle.

    If desired, stamp a flower in all three
    ink colors on the inside corner of your card, stamping off one time for each color.

    I hope you give this card a try!  I love punches because they are quick, easy to use, and don't require any other equipment.  Make some banners, or make some chevrons - see what you can do today!

    Karen

    ThePowerOfACard@gmail.com
    Etsy Shop: The Power of a Card
    https://karensliwinski.stampinup.net 


    Product List

    Tuesday, May 12, 2020

    Layering - It's Not Just for Winter

    One of the easiest ways to dress up a card is by adding layers.  These can be popped up, but they don't have to be.  I find that having a set of layering guides is very helpful because they allow you to visualize your card layout.  You can try out layers (albeit not in the colors you will be using in your card) before you cut any cardstock or DSP.

    I used old cardstock to make the layers and most of them are 1/4" larger than the previous, although some are just 1/8" larger.  You can do the same thing with other shapes, but for me, the rectangles are the ones I use most often.  Alternatively, you can use any of the layering dies available from Stampin' Up! and these are among the first dies I recommend for new stampers when they are ready to add dies to their collection.

    As a bonus, when you purchase at least $50 from my on-line store this month, I will send you a set of rectangle layering guides along with the hand-made Thank You card I normally send.  Remember to use the current host code (unless you spend over $150 and become your own host).

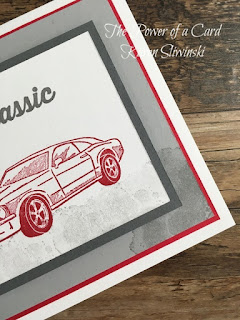
    The card I made in my video uses Geared Up Garage and could be sent as a Father's Day, birthday, or missing you Dad card.  There isn't much stamping and you could simplify the color scheme if desired.

    Gather your supplies:
    Whisper White 8-1/2" x 4-1/4" and 2-3/4" x 4"
    Basic Gray 3" x 4-1/4"
    Smoky Slate 3-3/4" x 5"
    Real Red 3-7/8" x 5-1/8"
    Geared Up Garage


    Stamp your sentiment first, then using the exhaust stamp and smoky slate, stamp off on a scrap paper, then along the bottom edge to provide a ground for your car.  Finish off the white panel by stamping the car in real red.  Adhere the basic gray layer with glue.

    Next, stamp the exhaust in the two corners of the smoky slate layer with smoky slate ink.  Pop up your car layer in the center of this smoky slate piece.  Finally, add the real red layer and then you can adhere all the layered pieces to your card.  (As I mentioned in the video, you can cut labels or other shapes out of the red and gray layers - nobody will see it and you will stretch your cardstock supplies further.)  Simple!

    Watch the video here: Layering - It's Not Just for Winter

    Karen

    Current Host Code:  ACC267J2

    ThePowerOfACard@gmail.com
    Etsy Shop: The Power of a Card
    https://karensliwinski.stampinup.net 


    Product List

    Tuesday, May 5, 2020

    Cheerful Little Hello


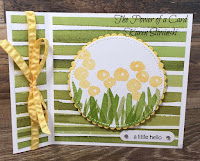
    The Abstract Impressions stamp set is one of my favorites and I am very sad to see it retire.  I created this adorable card to inspire you to get it while you can!  This card uses the paper from the Poppies suite of products (you'd never know it!) and some bright colors and is sure to bring a smile to whomever you send it to!  The card is easy to make and could easily be changed to a different color scheme.  Bring cheer to someone today!

    Karen


    Current Host Code:  ACC267J2

    ThePowerOfACard@gmail.com
    Etsy Shop: The Power of a Card
    https://karensliwinski.stampinup.net 

    Product List

    Super Sized Dotted Circles 3D Embossing Folder

    Embossing folders have been around for many years, but each year, Stampin' Up! surprises me and comes out with new and unique folders!  ...