Showing posts with label Pink. Show all posts

Tuesday, December 13, 2022

Wax Paper Pattern Transfer with Embossing Folders

Sometimes it's helpful to look back at cards I've made years ago because it reminds me of some fun techniques that have been neglected or forgotten about.  This is one of them and it uses wax paper to transfer the pattern from an embossing folder to a piece of paper.  It's like making a piece of Designer Series Paper (DSP) to match the embossed pattern.  Watch my video to see just how easy and fun this technique is!

You will need ordinary wax paper (I used Reynolds Cut-Rite), an iron and ironing board.  Make sure you've emptied the water from your iron if it can do steam because you need a hot, dry iron and no moisture.  You also need a piece of copier paper to sandwich your pieces for ironing.  Since the embossed pattern transfers to two pieces of cardstock, I've included measurements to make two cards.

Gather your supplies:

  • Cardstock: Polished Pink (2) 8-1/2" x 5-1/2"; Basic White (4) 3-1/4" x 4-3/4", 4" x 4-1/2" scrap
  • Wax Paper: 3-1/4" x 4-3/4"
  • Stamps:  Brightest Glow
  • Dies: All That
  • Embossing Folder: Wintry 3D
  • Ink:  Polished Pink
  • Ribbon: White Glittered Organdy 6"
  • Adhesive and Tools, including Blending Brush
  • Iron/Ironing board and a piece of copier paper
Whenever you transfer the embossing folder design using wax paper, I recommend using a piece that's just a little larger than what you intend for your card so you can trim it to size after you've colored it.  Take the piece of wax paper and emboss it with the snowflake design.  Then put a piece of Basic White on both sides of the wax paper, keeping them lined up.

Here is where the magic begins - take this wax paper sandwich and place it inside a folded piece of paper and iron it.  I use a hot setting (Cotton) and keep the iron moving over the paper.  The heat of the iron will move the wax to the two pieces of cardstock.  Keep the sandwich together as you return to your stamping workstation.

Open up the sandwich and remove the wax paper.  You won't be able to see or feel wax on your cardstock, so just remember that the two sides that are facing up are the sides you need to color.  Using your blending brush, add color.  You will find that the color applies so easily - much easier than paper without the wax design.  When you color both pieces, notice that you have both the pattern and the inverse pattern from the folder.  

After both pieces are colored, trim them to 3" x 4-1/2" and mat them with Basic White.  Add this to the card base with Multipurpose Glue at an angle.  From the remaining piece of Basic White, cut out two shapes in each size to match the sentiments of your choice from the All That Dies.  Stamp the sentiments in Polished Pink.  Before adding the sentiment to the front of the card, add a few pieces of ribbon to the back of the label with Mini Glue Dots.  Pop this label up with Dimensionals.  The remaining sentiment can be adhered to the inside of the card.

I used the second folder in the Wintry 3D set for my next two cards.  For the card on the right, I colored the waxed piece with Parakeet Party, Granny Apple Green and Garden Green.  I also used the Framed Florets Dies, Framed & Festive stamp set and Mini Ruffled Ribbon in Real Red.  On the other piece, I colored with Garden Green and Shaded Spruce.  I cut the finished piece in half and used a piece of Natural Finish Ribbon (also cut in half) to add as a mat.  The images in the Stylish Shapes squares are from Christmas Season and Brightest Glow. 


When I was first exploring this forgotten technique, I used the Quatrefoil Tile Embossing Folder because I thought it would be a versatile pattern that could be used for a variety of cards.  I colored the first sample in a rainbow of colors.  The leafy die is from the Meadow Dies and the rest is from the Sending Smiles Bundle.  I was thrilled with how happy this turned out!  My daughter Kristin colored the second card using neutrals (Gray Granite, Smoky Slate and Basic Gray).  I used the Nature's Prints bundle for the elements and stamped the sentiment and leaf in Gray Granite.  A matching ribbon in Gray Granite adds a perfect finish to this piece.  


Now that I've had such good results, I chose a folder with a definite direction and more of a scene - Whimsical Woodland 3D.  I love the mixture of trees and the variety of decorations on them.  The first one is colored in Balmy Blue and mounted on a Pacific Point card base.  The sentiment if from Jingle Jingle Jingle and the bling is from Metallic Mesh Ribbon and Rhinestones Basic Jewels.  My last card features the Sweet Candy Canes bundle and Sweet Sorbet ink.  The sentiment is from Stylish Shapes.  


I hope this has inspired you to try this fun technique.  It's a great way use your embossing folders in a different way and allow you to expand your card making skills!  Since this is my last post before Christmas, I hope you and your family have a blessed holiday.  I'll be sharing new products from our upcoming mini catalog in my next video - so exciting!

Karen


ThePowerOfACard@gmail.com

Etsy Shop: The Power of a Card

https://karensliwinski.stampinup.net 

https://ThePowerOfACard.blogspot.com

Images Copyright Stampin’ Up!®


Join my Facebook Group (The Power of a Cardmaker)https://www.facebook.com/groups/1042676296088278/?ref=share


My current host code for December is: ZDXDKWED

Please use this for orders less than $150 and you’ll get a special treat from me.

For orders over $150, you qualify for host rewards from Stampin’ Up! (plus a treat from me!).


Product List

Tuesday, November 1, 2022

Introducing the Fitting Florets Collection

I love it when we have a sneak peak at something from the mini catalog that will be released in January!  The Fitting Florets Collection has two stamp sets, coordinating dies, DSP, and an embellishment.  The Framed Florets Bundle will be in the new catalog, but the Framed & Festive stamp set, Fitting Florets 12" x 12" DSP and the Gold Adhesive-Backed Swirls are only available while supplies last.  All of these are available to purchase from my on-line store beginning November 1st - just click on the links below.

The card I chose to demonstrate is made with the scrappy strips technique.  While I've shown this before, it's been a little while - here is the link to Scrappy Strips - A Quilter's Perspective.  (Side note - when I went to add the link, I didn't realize just how old this video was - it was only my fifth video made, almost 2-1/2 years ago!!)  The papers in the DSP pack are perfect for this technique and it's a great way to show you all of them!  You'll need just a 4" square of each of them and this will be plenty to make at least four or five cards.  After I make this scrappy strip card, I present a LOT of examples in my video to showcase the collection, including a few made with other papers and color schemes to get you motivated!

Gather your supplies:

  • Cardstock: Polished Pink 5-1/2" x 8-1/2"; Basic White 4" x 5-1/4", 3-1/2" x 4-3/4", 3" x 3-3/4"; Balmy Blue 3-11/16" x 4-15/16" (just shy of 3-3/4" x 5"), 4" squares of Fitting Florets DSP (I used all six papers)
  • Stamp Bundle:  Framed Florets
  • Ink:  Polished Pink, Balmy Blue, Soft Succulent
  • Ribbon:  Double Stitched Balmy Blue 6"
  • Adhesive and Tools
Start cutting the DSP into strips that are wider at one end than the other.  Generally speaking, they are about 1/4" wide on the narrow end and 1/2" (ish) on the wide end.  Do not measure - just cut!  After you have cut at least two to three strips from each of them, make sure you turn some of them over as there are twelve different papers to use.  On the 3-1/2" x 4-3/4" piece of white, adhere the first strip, aligning the it with the edge of the white.  The strips are a little longer than needed - this makes it easier to position and will be trimmed to the exact size needed at the end. When you add the second strip, leave a very small gap (about 1/16"), flipping it (usually) so the wider end is opposite of how the first strip was placed.  Continue adding strips, mixing up the patterns and colors until you have reached the end of the white.  Then using your snips or trimmer, cut off any excess DSP.  

Mat this scrappy strips piece with the Balmy Blue layer.  Adhere the ribbon horizontally on top of this and add this to the front of your card with Dimensionals.  To finish the card front, cut out the smallest oval from Basic White.  We only need the interior oval - save the outside one for another card.  Stamp the sentiment in Balmy Blue toward the left side and stamp the flowers in stamped-off Polished Pink.  Add more Dimensionals and adhere over the ribbon.  I stamped another greeting on the inside panel and added a few leaves with stamped-off Soft Succulent.  Stamp the flowers in Polished Pink on the envelope flap to finish this beautiful birthday card!


I love when the dies not only cut out the stamped images from the stamp set, but designs from the DSP too!  For this card, I cut out two floral clusters in their entirety, plus a couple that were at the edge.  I love being able to place them on the edge of my panel - it allows you to fill up the space and not waste any of the DSP!  The gold swirls are the perfect touch to embellish this lovely card and because they are low profile, they are easy to mail.


On my next card, I used the same oval as the one I cut for my first card, but this time, I'm using both parts.  I use blending brushes to lighly color the outer oval with Soft Succulent.  The leaves stamped on the smaller oval are also stamped on the card base in two of the corners with Evening Evergreen ink.  It's a subtle touch that adds an extra bit of character to the card.  The Gold Foil die cut leaves coordinate well with the swirls and the Evening Evergreen bow completes the look.


This Thank You card is super simple!  I cut the oval ring of hearts from a white panel and then used my Blends to color the remaining hearts to match my card base.  I left them right on my cutting plate and this made it super easy to color!  After stamping my sentiment on the inner oval from the large oval frame, I popped it up in the center and added a scattering of those colored hearts (and I added more on the inside panel next to my sentiment too!).  I love both the simplicity and ease of making this card.


Next, I feature more of the DSP plus some of the other stamps and dies.  The fun thing about this design is that the DSP is the card base and not colored cardstock!  I loved this layout so much, I decided that this will be my next video, scheduled to come out in the middle of November - stay tuned!


The Framed & Festive stamp set has some great Christmas sentiments and was the inspiration for this beautiful slimline card!  To make the ornaments, I chose the Layering Circles Dies in three different sizes to fit the three sentiments which were stamped in Evening Evergreen.  I used my Blending Brushes to lightly add Soft Succulent to the outside edges.  If desired, add some Wink of Stella to make them shine just a little!  The tea bag dies from Tea Cup Dies cut from some Glimmer Paper made the top of the ornament.  I used a Stampin' Write Marker to draw the strings, popped up the ornaments with Dimensionals and finished with a knot of Evening Evergreen ribbon.  The slimline envelopes are perfect for this card because they come in three colors, including Soft Succulent and White!!


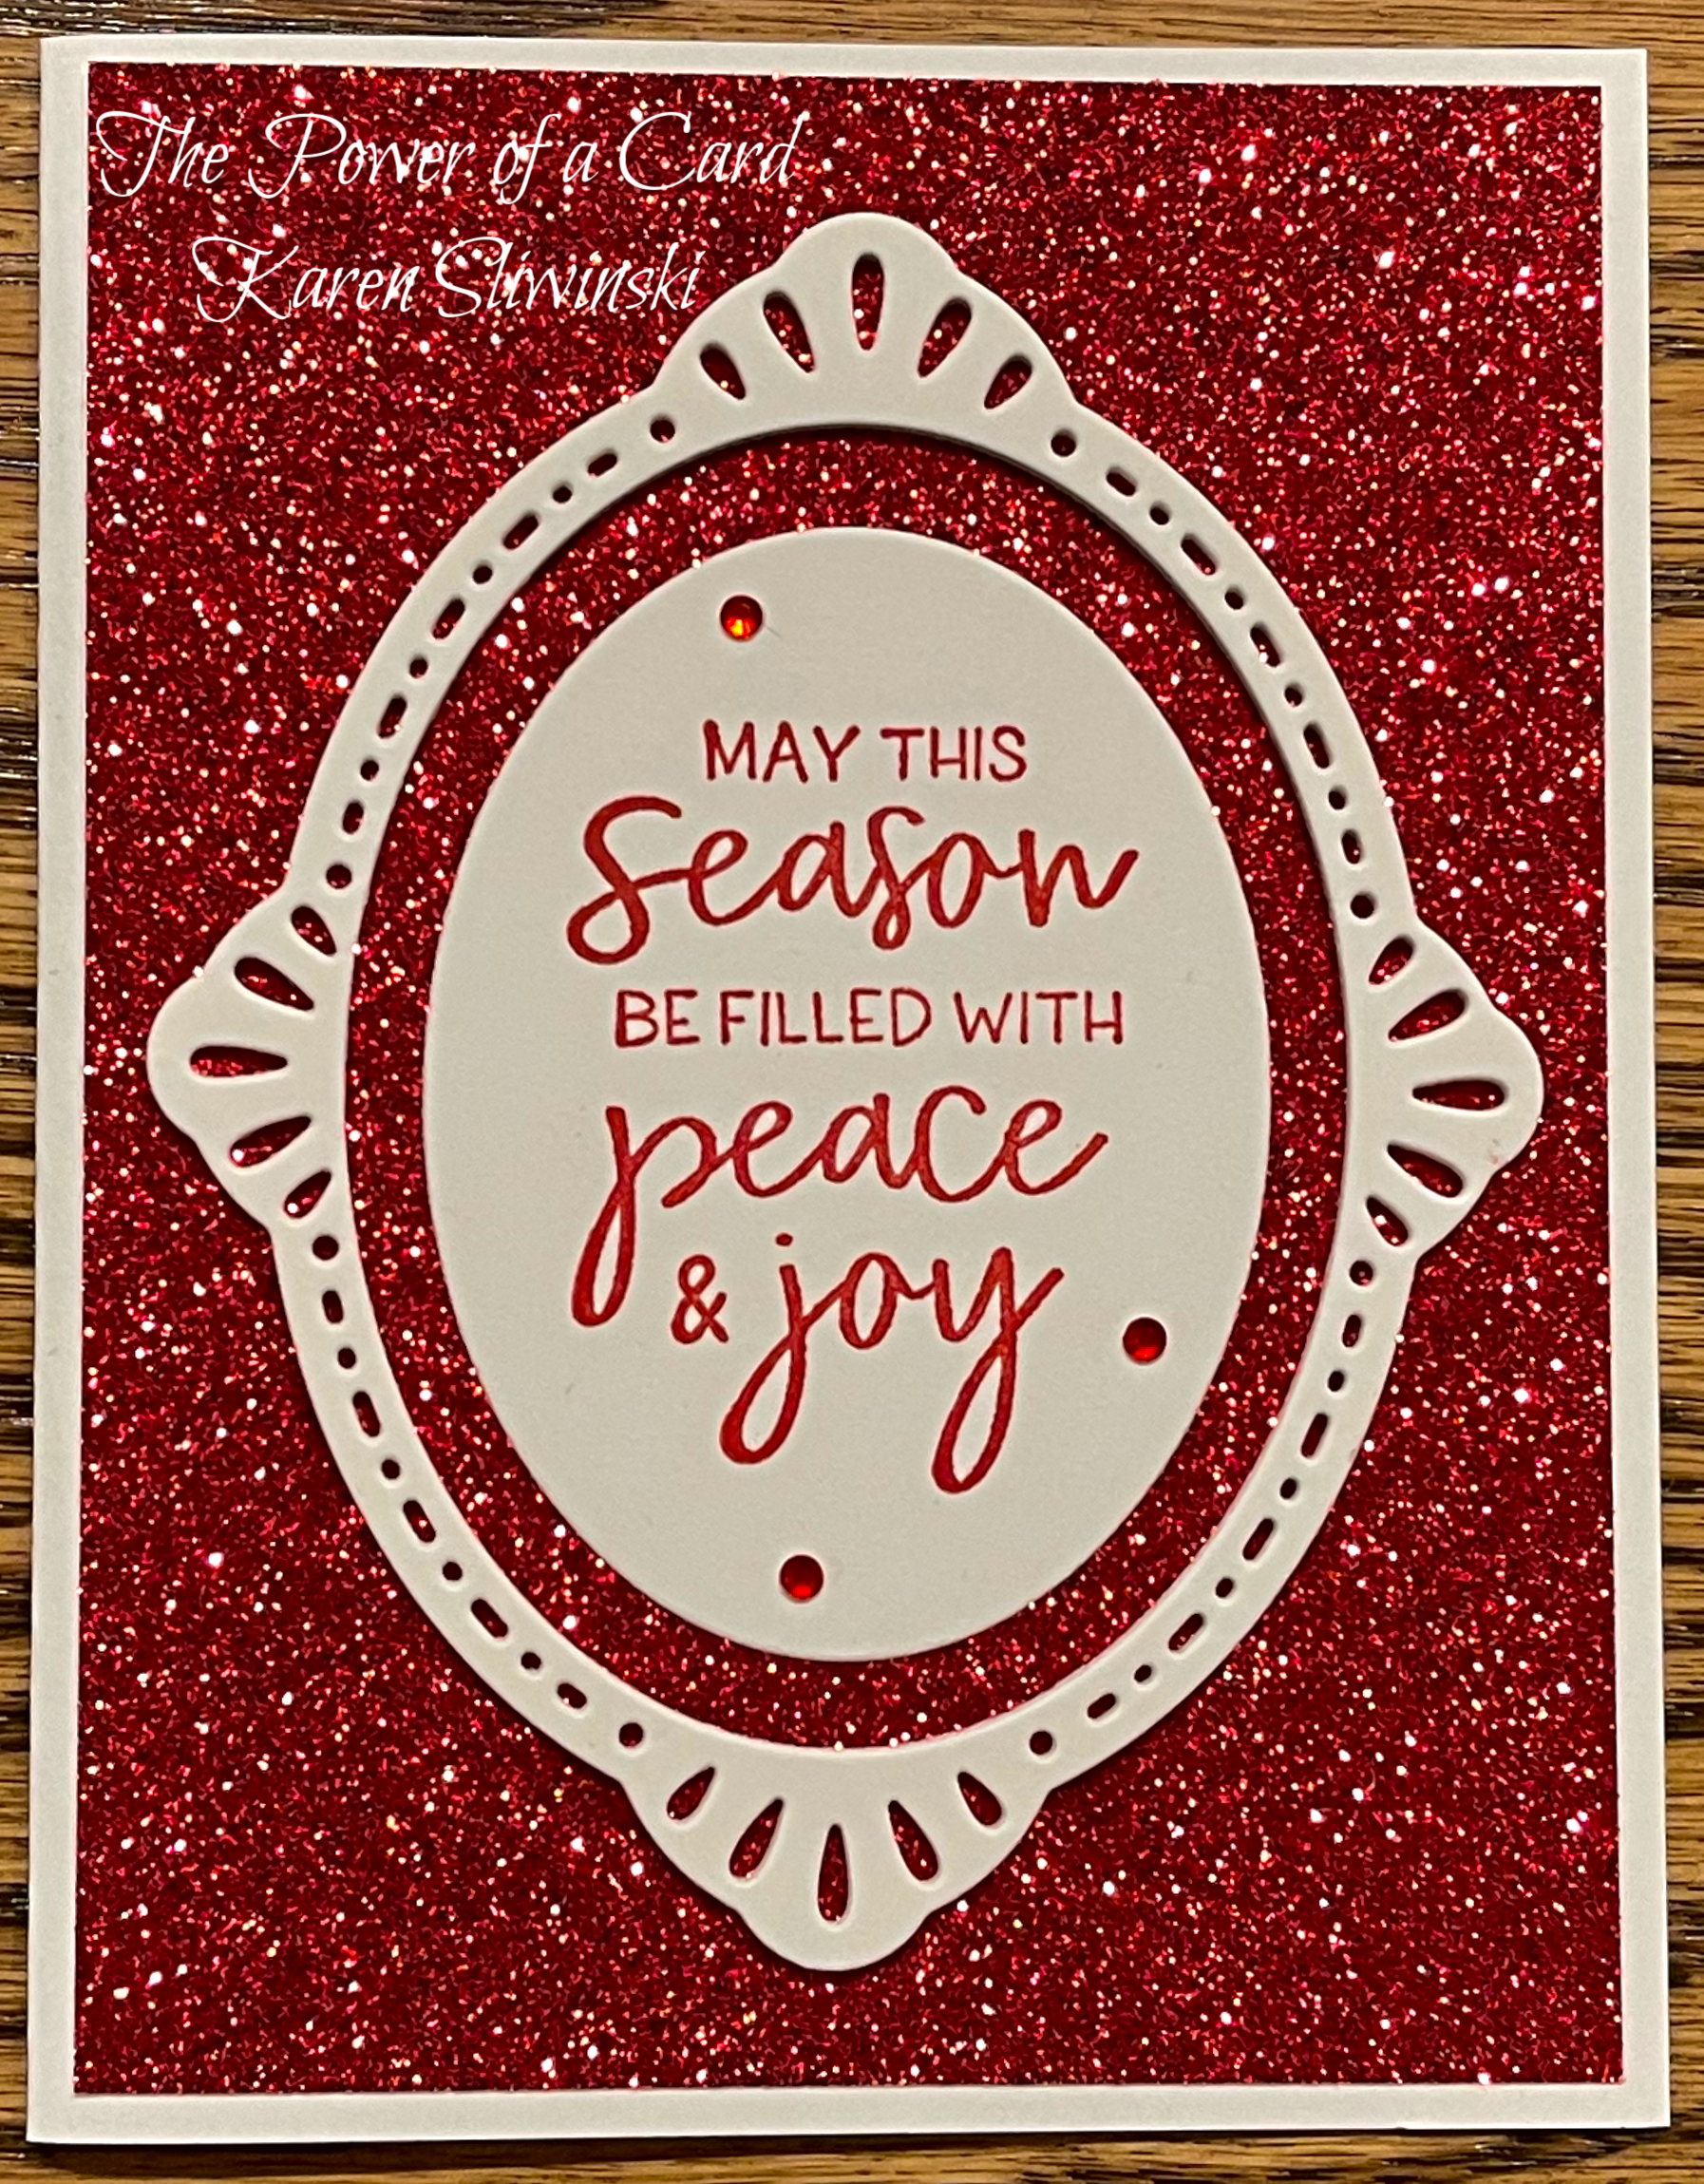
Here's another simple card that makes a big impact.  Glimmer paper is the backdrop to the beautiful framed sentiment.  The photo does not capture the sparkle of this card very well, but it does show in the video.  I layered four or five ovals to make it look like chipboard and have dimension.  The Red Rhinestones around the sentiment are all that you need for this beauty!  I used the Brightest Glow stamp set for my interior sentiment and envelope - it's another great one to add to your collection when making holiday cards.


This sample uses a selection of soft pastel colors for the floral sprig on top of the oval.  I stamped the flowers and sentiment in Basic Gray ink for a softer look.  The Iridescent Pearls are great with this card and coordinate with the subtle polka dots in the DSP.  Just think of the variety of looks you can get by just changing up the color scheme!

My last card (I told you I had a lot!), is similar to the sparkly one, but in a different orientation and even easier!  I selected a paper from the Host DSP in the July - December mini catalog and only did one layer of the outer oval and popped up the inner oval.  I also used a snowflake from the Celebration Tag Dies.  There is just something about this card I adore - the Polished Pink color makes an unusual, but fun, Christmas card!

I hope you have loved this introduction to the Fitting Florets Collection.  I have links to the entire collection below (plus some of the individual items) and encourage you to get them while you can!

Karen


ThePowerOfACard@gmail.com

Etsy Shop: The Power of a Card

https://karensliwinski.stampinup.net 

https://ThePowerOfACard.blogspot.com

Images Copyright Stampin’ Up!®


Join my Facebook Group (The Power of a Cardmaker)https://www.facebook.com/groups/1042676296088278/?ref=share


My current host code for November is: VTZWFTBS

Please use this for orders less than $150 and you’ll get a special treat from me.

For orders over $150, you qualify for host rewards from Stampin’ Up! (plus a treat from me!).


Product List

Tuesday, July 12, 2022

Fond of Autumn and So Much More!

When I was first looking through the new July - December Mini Catalog, I skipped right over this bundle and you may have too!  But after looking through the catalog several more times, I realized that this is a hidden gem and in my video, I show you just why I think that. 


The dies are the key - they do so much more than what you think at first glance.  Let's look at what they can do.  Firstly, they cut out the big leaf/flower stamp as a whole.  Then there is a piece that will cut out inside parts and when you combine this with the outside die, you get an entirely different piece as you can see in this photo.

Now let's look at the other pieces.  When you stamp the large image, you can cut it into four sections!  They don't have to be used together as they are created with the stamp - genius!  Of course, there are individual dies for the three smaller stamps and the banner, but that first one is a game changer!!

Since we are barely into summer, I wanted to show you a card that is not autumn at all and I think you'll agree that Positively Pink and Fresh Freesia are not fall colors!  

Gather your supplies:

  • Cardstock:  Polished Pink 5-1/2" x 8-1/2" and 4" x 5-1/4"; Basic White 4" x 5-1/4", 3" x 3" and 2" x 3"
  • Stamp Bundle:  Fond of Autumn
  • Ink:  Tuxedo Memento Black, Polished Pink and Parakeet Party
  • Dies:  Stylish Shapes (and the Autumn Bouquet dies from the Bundle)
  • Blends: Polished Pink, Fresh Freesia, Daffodil Delight and Parakeet Party
  • Ribbon: Black & White Gingham Ribbon 21"
  • Adhesive and Tools


Start by folding your card base in half and creasing it well.  On the Polished Pink rectangle, randomly stamp the single flower with Polished Pink ink all over the front, rotating the image as you move around the layer.  I like to start at the center and work my way to the outer edges.  Since you have the stamp inked, go ahead and stamp the envelope flap and lower right corner of the inside white layer.


Clean the flower stamp and switch to black - stamp two flowers on the white scrap.  Color these with the Blends as I show in the video.  I didn't do much blending as these flowers and leaves are pretty small.  When done coloring, use the flower die to cut them out.  While at the Stampin' Cut & Emboss machine, cut out the Stylish Shapes circle.  On that piece, stamp your sentiment with Parakeet Party ink, leaving space to add your flowers to the lower left portion of the circle.

Ready for final assembly!  Add the Fresh Freesia flower to the circle with Multipurpose Glue, then add the Polished Pink flower with a Dimensional, overlapping just a little bit.  Before adding this to the Pink layer, add the ribbon and tie a bow.  I like to do my bows without cutting it from the spool to save ribbon, but if you prefer, you can cut about 21" to make your bow.  Pop up the circle on the left side and you're all done!


You know me well by now and know I always make more examples to show you.  My first one uses the large intricate die.  I used DSP shown in the catalog with another stamp set called Rustic Harvest.  This print was just perfect because it has acorns and oak leaves!  Pair this with a simple matted sentiment, a few pearls and you have a beautiful card in just minutes.


My next one features the Cottage Gingham DSP pack - a fabulous large pack of paper with sketchy gingham patterns in small and large scale sizes.  There are four sheets of each one - perfect for making cards in bulk.  In fact, I am featuring them in my Christmas in July card classes - want to join us?  (Contact me for dates.)  For this card, I used a strip of the DSP and added a small border of Garden Green.  The leaves and acorns were stamped in Early Espresso ink and are arranged as a simple spray of nature.  I used the Faux Suede ribbon to add some interest behind the sentiment.  It's a fall card, but uses less stereotypical autumn colors.

Another non-typical color palette is used for this beauty.  I paired Pale Papaya with Soft Seafoam and was very happy with the look!  The acorns are colored with Crumb Cake to keep with the muted look of the leaves and berries.  The Split Card Textures Dies make an interesting backdrop for the cluster of leaves.    I added a few of the new Fine Sparkle Adhesive-Backed Dots (which are great for adding bling with a low profile) and a double bow in Pale Papaya to add the finishing touches.


Ok, I had to do a sample with traditional colors.  Since it is watercolor month (who knew?), I used Saddle Brown Stazon ink on Fluid 100 Watercolor paper to stamp the large designs.  Many people don't know about Stazon in any color but black - but the warm brown tone fit better with my colors.  I then used my Water Painters to color my leaves, flowers and berries.  After cutting them apart, I arranged them around my banner which is popped up with Dimensionals.  The subtle pattern in the DSP adds texture without distracting from the beautiful pieces.  


I hope you are like me and find this bundle way more versatile than the first glance indicated.  Which one of my cards was your favorite today?  What are you going to create first - something traditionally autumn in theme, or something else?  Happy creating!

Karen


ThePowerOfACard@gmail.com

Etsy Shop: The Power of a Card

https://karensliwinski.stampinup.net 

https://ThePowerOfACard.blogspot.com

Images Copyright Stampin’ Up!®


Join my Facebook Group (The Power of a Cardmaker)https://www.facebook.com/groups/1042676296088278/?ref=share


My current host code for July is: Z24FNYHV

Please use this for orders less than $150 and you’ll get a special treat from me.

For orders over $150, you qualify for host rewards from Stampin’ Up! (plus a treat from me!).


Product List

Make Vibrant Backgrounds with Watercolor Paper & Stamping

Watercoloring is one of my many hobbies, so when I can use a watercolor technique in my card making, that's just a bonus!  When you comb...