Wednesday, December 30, 2020

Turtle Love - Displayable Fun Fold

When you hear someone say they are making a fun fold card, do you cringe and think that's too complicated for me?  I'm here to tell you it isn't - and you are going to love this one because it stands up nicely for display!  I've had many people tell me that the people who get my cards keep them out for all to see (LeAnna and Ruth just told me that again recently!) and this card makes it easy to set out and be enjoyed!  Watch Turtle Love and see for yourself!

Gather your supplies:

  • Cardstock:  Whisper White 5-1/2" x 8-1/2", scored at 2" and 3-1/8" from each short side, plus a scrap for your label; Pacific Point scrap for label; Whale of a Time DSP (2) 1-3/4" x 5-1/4" and 2" x 5-1/4"
  • Ink:  Granny Apple Green and Pacific Point
  • Stamp set: Whale Done
  • Dies: Hippo & Friends
  • Adhesive and Tools
Score your card base at 2" and 3-1/8" on the short side, then flip and repeat from the other side.  Burnish the innermost creases, folding towards the center.  Flip the card over and burnish the outside creases in the opposite direction.  If you desire to keep the DSP pattern continuous across the card, cut the left panel (1-3/4") first, then the center panel (2") and then, the right panel (1-3/4").  Adhere these to the card base.


Now you're ready to assemble your label.  I stamped my turtle in Granny Apple Green and my sentiment in Pacific Point, then adhered this to my Pacific Point layering label.  Since I didn't want to cover up the adorable stream of swimming turtles, I placed my label near the bottom of the center panel.  Remember to only place glue in the center of the label as it will stick out on both sides.  You can add your personal message on the back of the card, and place in a standard sized envelope.


I fell in love with this fun fold as soon as I saw another demonstrator making cards with this design.  You can combine DSP and embossed cardstock for the center panel, or even leave it plain.  The only thing to remember is that your label and anything you attach to it (like the flowers in my example) do not exceed about 4" in width.  Let me know what you've chosen for your fun fold that stands on its own!

I hope you enjoy these other examples - the last one is a sample made from new products being released next week!  I plan on using this fun fold in my January Card class, which will be all fun folds - hope you can join me!


Karen


ThePowerOfACard@gmail.com

Etsy Shop: The Power of a Card

https://karensliwinski.stampinup.net 

Images Copyright Stampin’ Up!®


Join my Facebook Group (The Power of a Cardmaker)https://www.facebook.com/groups/1042676296088278/?ref=share


My current host code is: 6NFDC6R2  Please use this for orders less than $150 

and you’ll get a special treat from me.  For order over $150, you will

qualify for host rewards from Stampin’ Up! (plus a treat from me!).


Product List

Wednesday, December 16, 2020

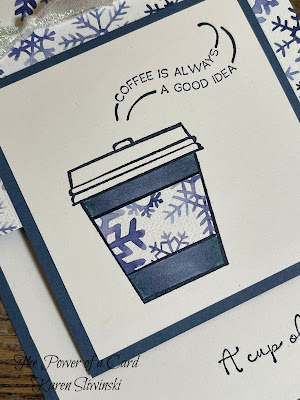
Winter Coffee Thank You - Paper Piecing Technique

Paper piecing may sound complicated, but it can be quick and easy.  Start with a stamped outline image on solid cardstock.  Then stamp the same image onto Designer Series Paper and cut out a portion of the image to glue onto your first image - that's all there is to it!

Watch my video to see how I made an adorable thank you card using the Press On stamp set and decorated the coffee sleeve with snowflake paper.  


Gather your supplies:

  • Cardstock:  Misty Moonlight 4-1/4" x 8", scored at 5-1/2" and 3-1/4" square; Whisper White 3" square and 4" x 5-1/4"; Snowflake Splendor DSP 4-1/4" x 1-1/2" plus a scrap 
  • Ink:  Night of Navy
  • Stamp set: Press On
  • Misty Moonlight Stampin' Blends
  • Snowflake Splendor Ribbon - 12"
  • Adhesive and Tools


Stamp the coffee cup in the lower left corner of the white square.  Also stamp the middle portion of the coffee cup on the DSP and cut out the middle band (the coffee sleeve) right at the line.  Add the swirly sentiment above the coffee cup.  Using your blends, color the cup, then add the DSP sleeve to the middle of the cup.  Mat the white square with the Misty Moonlight square. 

Crease the large Misty Moonlight card base and adhere the large piece of DSP to the flap.  Tie the ribbon around the flap at the top of the card.  

Stamp the "A cup of thanks" sentiment in the lower right corner of the large white piece and add it to the inside of the card.  Adhere the square to the flap, making sure you only add adhesive to the top portion of the square.


While I made a wintery card in my video, it would be a snap to make this card in any theme you want.  My second example uses the Whale of a Time DSP and Pretty Peacock and Just Jade - it has a completely different feel with the exact same layout.  Try paper piecing with your outline stamp sets.  Typically, this technique works better with smaller designs of DSP, but experiment and see what you like!


Karen


ThePowerOfACard@gmail.com

Etsy Shop: The Power of a Card

https://karensliwinski.stampinup.net 

Images Copyright Stampin’ Up!®


Join my Facebook Group (The Power of a Cardmaker)https://www.facebook.com/groups/1042676296088278/?ref=share


My current host code is: 6NFDC6R2  Please use this for orders less than $150 

and you’ll get a special treat from me.  For order over $150, you will

qualify for host rewards from Stampin’ Up! (plus a treat from me!).


Product List

Tuesday, December 1, 2020

Simple Watercoloring with Stunning Results

Have you ever thought you'd like to try watercoloring on your cards?  I will show you how to do watercolor using your ink pads and Water Painters - it's a simple technique that will give you stunning results.  The key to making it simple is starting with an embossed outline image.  Watch the Simple Watercoloring video and then give it a try!


Gather your supplies:

  • Cardstock:  Crumb Cake base; Basic Black 3-7/8" x 5-1/8"; Whisper White 3-3/4" x 5"; Granny Apple Green 1-1/2" x 5"; Watercolor paper 1-3/4" x 5" plus a scrap 
  • Ink:  Memento Black, Versamark, Granny Apple Green, Garden Green, Crumb Cake, Cajun Craze and Cherry Cobbler
  • Stamp/Die Bundle: Quite Curvy
  • Clear Stampin' Emboss Powder
  • Adhesive and Tools

Using your Stamparatus, stamp the leaf spray with black ink on watercolor paper, then clean off the stamp and ink again with Versamark ink.  Apply clear embossing powder and use the heat tool to set.  Repeat with the bird image.  The embossed images will act as a barrier when you apply water, making it much easier to get a great watercolored element for your card.

Take your acrylic block and pick up some Granny Apple Green ink directly from the ink pad.  Use your Water Painter to add some water to the block - just make a puddle on one portion of the ink.  This can be used to apply a light wash over all of the leaves.  You want to get the image wet so that when we apply more color, it will "move" with the water.  Then add more green (both Granny Apple and Garden) to the leaves and you will get wonderful shading in the leaves.  If the leaves get too wet, just add a bit more water.  That's why it is imperative to use watercolor paper - it is meant to hold water and won't pill.  Do the same process with the bird - I started with the Crumb Cake for the bird's head and breast, then did Cajun Craze for the back and tail feathers, darkening it up with Cherry Cobbler.  You will find that you can get amazing color blending with watercoloring!  And don't be afraid to leave some white space - it just adds interest to your images.

I like to allow my watercolor images to dry on their own, but if you just can't wait, use your heat tool on low setting to dry them.  Cut out the images with the dies and now we are ready to assemble.  Add the Granny Apple Green rectangle to the white panel.  Place this in your Stamparatus and position (but don't adhere) the leaves.  Then place your sentiment where you want it to fall just above the leaves.  Because these are photopolymer stamps, you can bend them to just the perfect curve.  Stamp the sentiment in black.  Finish assembling the card by popping up the leaves and bird, then the entire panel onto the card base.  

The more you practice, the easier watercoloring will become.  You can have as watery a look as you want - here is a card where it doesn't look watery at all!  I just took my time, adding layers and layers of color until I got the look I wanted. I'd like to hear how you like this technique!  You can share your results on our group Facebook page.  


Karen


ThePowerOfACard@gmail.com

Etsy Shop: The Power of a Card

https://karensliwinski.stampinup.net 

Images Copyright Stampin’ Up!®

Join my Facebook Group (The Power of a Cardmaker):  https://www.facebook.com/groups/1042676296088278/?ref=share


My current host code is: G4D4QWWA  Please use this for orders less than $150 

and you’ll get a special treat from me.  For order over $150, you will

qualify for host rewards from Stampin’ Up! (plus a treat from me!).


Product List

Super Sized Dotted Circles 3D Embossing Folder

Embossing folders have been around for many years, but each year, Stampin' Up! surprises me and comes out with new and unique folders!  ...