Wednesday, July 28, 2021

Stepping it up with Spritzes!

Sometimes, it's the smallest touches that take your card making to the next level.  Adding spritzes to your card can do just that.  Watch my latest video to learn how to use a Stampin' Write Marker to flick tiny specks of color onto your card.  Just this quick and simple technique will make a difference, I promise.


Gather your supplies:

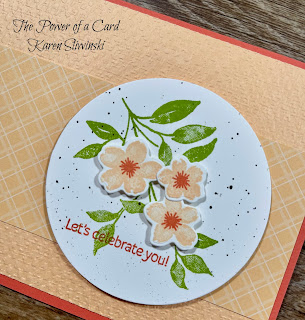
  • Cardstock:  Calypso Coral 8-1/2" x 5-1/2"; Pale Papaya 4" x 5-1/4"; Pale Papaya DSP 2-1/4" x 5-1/4"; Basic White 4" x 5-1/4" and 3-1/4" x 4-1/2"
  • Stamp Bundle: Sweet as a Peach
  • Ink:  Granny Apple Green, Pale Papaya, Calypso Coral
  • Tasteful Textile 3-D Embossing Folder
  • Layering Circles Dies
  • Basic Black Stampin' Write Marker
  • Adhesive and Tools

With the Stampin' Cut and Emboss machine, use the largest circle die to cut a circle from the narrower rectangle of white.  Then emboss the Pale Papaya layer using the Tasteful Textile embossing folder.  Score your card base at 4-1/4" and crease with the bone folder.  Add the embossed layer to the base using just a little extra glue due to the texture of the paper.  Add the coordinating DSP strip about 3/4" up from the bottom.

Next we will work on our focal image.  Stamp the three flowers in Pale Papaya on the remainder of your white rectangle.   The center of each flower is stamped in Calypso Coral.  Cut these out using the die and add Mini Dimensionals to the back.  Stamp the greenery with Granny Apple Green and the sentiment in Calypso Coral near the bottom.

When spritzing, it is always a good idea to place some scrap paper down to protect your work surface and clear away anything that could catch some unwanted spritz.  Place the brush tip end of the Stampin' Write marker just inside the cap and flick it toward the circle and away from you.  Sometimes you get a lot of spritzing, sometimes not so much.  It is always random (part of the charm) and a little unpredictable.  My suggestion is to practice on scraps until you get a feel of how far the spritzes will fly and in which direction.

Add the flowers into the openings of the branch and pop the whole piece up on your card as shown.  Finish off the inside by stamping Happy Birthday in Calypso Coral over the three flower images which are stamped in Pale Papaya.  I stamped It's your day and some small flowers on the corner of my envelope to coordinate.  My original sample was monochromatic using Highland Heather and Gorgeous Grape.

Since moving to Cleveland for the summer while our new house is being built, my daughter and I have enjoyed walking all over the city.  One of our favorite walks is along the Cuyahoga River and in one stretch just past Collision Bend, there are some lovely wildflowers (and rabbits which thrill Kyra's dog, Brinkley).  The colors in this next sample were inspired by those flowers we see on our walks.  This card was also spritized with black.  I used the Dragonfly Garden stamp set.


My next sample uses the Art in Bloom Bundle, which has a stamp set, die and embossing folder.  The really cool thing about this embossing folder is that you can place the die in the folder and emboss and cut the three large flowers in one pass through the Stampin' Cut and Emboss machine!  How cool is that?  I used Poppy Parade and Smoky Slate for my color palette and I cut the gray top layer using the Basic Border Dies.  For this one, I spritzed in Basic Gray to keep it a little softer in appearance.
My last two samples are sneak peeks of products from our upcoming new catalogs - the August - December Mini Catalog and the Sale A Bration catalog.  The sheep stamp set, it's coordinating dies and the DSP are all free items with a qualifying purchase during August and September.  The shape behind the sheep was spritzed with Misty Moonlight.  The final sample is made from the Gingerbread and Peppermint Suite, available on August 3rd.  I used my white ink refill and a Water Painter to flick white onto the Kraft paper - the perfect touch for my gingerbread themed card.


I hope you like this technique - it's fun, easy to do and really does spruce up your cards.  There is no better time than now to schedule a class or workshop - you can earn free rewards and make these beautiful cards for yourself.  Or better yet, join my team and earn free rewards too!  Let me know how I can help you make your goals.

Karen


ThePowerOfACard@gmail.com

Etsy Shop: The Power of a Card

https://karensliwinski.stampinup.net 

Images Copyright Stampin’ Up!®


Join my Facebook Group (The Power of a Cardmaker):  https://www.facebook.com/groups/1042676296088278/?ref=share


My current host code is: 9RQCM2NJ  Please use this for orders less than $150 

and you’ll get a special treat from me.  For order over $150, you will

qualify for host rewards from Stampin’ Up! (plus a treat from me!).


Product List

Wednesday, July 14, 2021

Decorative Masks, aka Stencils!

Stencils are something we all are familiar with, but they might not be something you've tried using in your card making.  Stampin' Up! calls them Decorative Masks, but I call them fun!  They are inexpensive and come in two different packs.  In the card I demonstrate on my video, I am using the newest set called Plenty of Patterns, but I also made cards to show the versatility of stencils and use the Basic Patterns set as well.

Gather your supplies:

  • Cardstock:  Thick Basic White 8-1/2" x 5-1/2"; Basic White 3-1/4" x 3-1/4"; Basic Black 3-3/8" x 3-3/8"
  • Stamp sets: Biggest Wish and Sunny Sentiments
  • Ink:  Fresh Freesia, Polished Pink, Jet Black Stazon
  • Plenty of Patterns Decorative Masks
  • Blending Brushes
  • Matte Black Dots
  • Stamparatus (optional)
  • Adhesive and Tools


When working with stencils, one thing that is handy to have is low tack tape or post it notes.  For the card I make, the decorative mask has four patterns on it and obviously, I only want one section of it.  I used tape to mask it off and prevent me from getting unwanted segments of another patterns on my square.  

Center the white square on the back side of the stencil pattern you want to use.  I like to add some tape from the back so that the paper does not move once you've got it positioned.  Place some scrap paper down so you can tap off your blending brushes.  Start with the Fresh Freesia and blend it darkest in the center of the design and fading out as you approach two thirds of the pattern.  Make sure you circle your brush in both directions to get the best coverage.  Switch to Polished Pink and work the color from the outside inward, blending with the purple ink already on the square.  

Remove the paper from the stencil and mount it to the black square.  You can clean your stencil by running it under water at your sink - the ink easily rinses off.  Position your square on your card front (but don't stick it down just yet).  Use this to help guide you on the placement of Birthday, stamped in Fresh Freesia.  Add happy in Stazon ink (which gives a nice intensely black image).

Now you can finish up the card by popping up the square with dimensionals (I used black, but you can use white ones if that's what you have).  The final touch for the front is to add a black dot in the center of the design.  The inside sentiment is stamped in Polished Pink.  I used my Stamparatus because I was going to make several birthday cards and this saves time.


My first alternative example is very simple.  I stenciled the clamshell pattern on a panel of white (it measures about 2-1/4" wide by 5-1/2" tall) with Real Red ink. I added this to the front of my card and edged it with a small strip of Real Red paper.  The Night of Navy images and scalloped mat behind the sentiment make this nautical card just perfect.  You could stamp directly onto the card front if you used tape or post it notes to block off the right side.


You don't always have to ink the entire image of the mask.  In this sample, I layered Pale Papaya ink onto my layer of the same color.  I used the polka dots mask from the Basic Patterns set and brushed on color over a circular area on the right side only, keeping the darkest color near the center and fading out toward the edges.  This is a great technique to subtly highlight an area and add interest and texture without too much distraction.  I used Expressions in Ink Specialty DSP and the Artistically Inked Bundle (an amazing suite of products that I highly recommend).


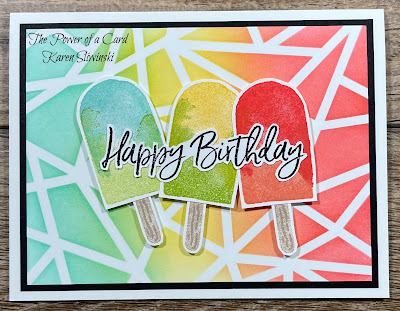
My last card is my favorite!!  I placed the geometric mask over a panel of white and taped it down.  Next, I started with Daffodil Delight in the center portion of the design.  Then I blended Poppy Parade from one side toward the center, overlapping the yellow a little bit.  From the other side, I blended Coastal Cabana in the same manner and this yielded a lovely rainbow of color with striking white lines throughout.  I stamped some popsicles from the Sweet Ice Cream Bundle and fussy cut the birthday sentiment to complete this adorable card.  

I hope you will give stencils a try - they are fun, economical, and can add so much interest to your cards. And here's a spoiler alert - there just might be a new set available in our mini catalog coming out next month!

Karen


ThePowerOfACard@gmail.com

Etsy Shop: The Power of a Card

https://karensliwinski.stampinup.net 

Images Copyright Stampin’ Up!®


Join my Facebook Group (The Power of a Cardmaker):  https://www.facebook.com/groups/1042676296088278/?ref=share


My current host code is: WFKAKWQQ  Please use this for orders less than $150 

and you’ll get a special treat from me.  For order over $150, you will

qualify for host rewards from Stampin’ Up! (plus a treat from me!).


Product List

Super Sized Dotted Circles 3D Embossing Folder

Embossing folders have been around for many years, but each year, Stampin' Up! surprises me and comes out with new and unique folders!  ...