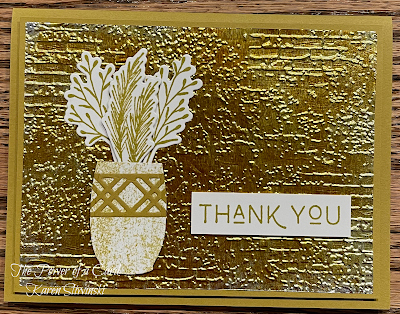
This is a fun technique that I've done many times over the years, mainly when embossing folders remind me of metal plates like you find on a truck or tool chest. I will show you how to emboss aluminum foil to make a gorgeous decorative element for your cards. In my video, I use regular weight foil and adhere it to a piece of cardstock first, but you can use heavy weight foil all on its own.
The first card I show in the intro was made by cutting a deckled rectangle after adhering the foil but before embossing (and using a deckled rectangle for the sentiment), but I will demonstrate my preferred method. This is to adhere, emboss and then fold the excess foil to the back side of the piece. This help prevent foil from lifting up on the edges if there isn't glue in a portion of it. So grab your Reynolds Wrap and let's make some cards!
Gather your supplies:
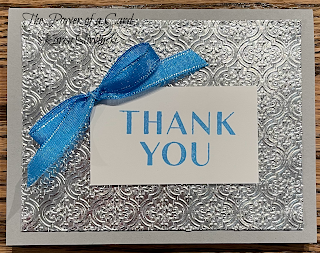
- Cardstock: Smoky Slate 8-1/2" x 5-1/2" and 3/4" x 5-1/2"; Basic White 3-3/4" x 5"and 1-3/4" x 3"
- Stamp Set: Phrases for All
- Ink: Azure Afternoon
- Embossing Folder: Quatrefoil Tiles
- Other: Sheer Ribbon Combo Pack
- Aluminum Foil
- Adhesive and Tools
Start by cutting a piece of foil just a little larger than the large white rectangle. Add small lines of glue all over the cardstock, trying to get good coverage, but only small amounts of glue. Place this piece on the back side of the foil and press all over the cardstock to get excellent adhesion. Place this piece in the embossing folder and emboss with the Stampin' Cut & Emboss machine.
I really like to fold the extra foil to the back side of my piece as I demonstrate. This will prevent any foil from lifting up at the edge if there isn't total glue coverage. The easiest way I found to do this is to hold the piece almost vertical and just fold down. Make sure the corners are tucked in so they don't stick out after folding. Adhere this piece to the front of your card base.
Stamp the sentiment with Azure Afternoon ink on the small white rectangle and add this to the card with Stampin' Dimensionals. I placed it off center because of the bow. Tie a bow with the Azure Afternoon ribbon and adhere to the upper left corner with a Mini Glue Dot.
To finish up the card, emboss the strip of Smoky Slate with the same embossing folder and place on the inside bottom. It looks really nice to emboss the envelope flap with the same folder - it also adds continuity.
When I was first making cards for this
video, I started with the obvious embossing folder - Metal Plate. I used the Zany Zoo stamp set and the Radiating Stitches Dies for this adorable birthday card. I like how the Pebbled Path and Sweet Sorbet cardstock look with the embossed foil.
Next I used the Basics 3D folder (in my favorite cross hatch design) and the Hello Ladybug stamp set for a cheerful Hello card. Not only is this a cute layout, it's a great way to use up scraps of paper. You don't have to use Basic white because the foil covers it entirely, so why not use up all of your old paper?
My next card features the Merry Melody 3D embossing folder and the Zoo Crew DSP. I matted the three musicians in black and added a stitched circle with musical notes to complete my lyrical birthday card. I love the Lemon Lime Twist card base as it really makes the frog pop!
For the next sample, I adhered my foil to a square of cardstock, then cut a circle using the Stylish Shapes dies. Then, I embossed the circle with the Basics 3D folder. When handling this piece, just be careful not to catch the edge where the foil might try to lift up since we aren't folding it over. I used Bubble Bath as my base and then coordinated with Moody Mauve for this birthday celebration.
Lastly, I added some extra touches by using my Stazon ink pads. For the first one, I embossed the panel with the Timeworn Type 3D folder. Then I lightly ran the ink pad over the raised portions, which left touches of black. A few strips of white set the embossed piece off nicely and the crocodile (or is it an alligator?) looks fabulous on the black card base. On the second card, I liberally applied ink over the embossed piece (Exposed Brick 3D) with the saddle brown ink pad. This took hours to fully dry, so you need lots of patience. However, the result is a beautiful antique gold look that paired very well with Wild Wheat cardstock and the Earthen Textures bundle.
I hope you've enjoyed using an everyday household item to spice up your cards. We have so many great embossing folders in the catalog and on-line - give them a try!
Karen
ThePowerOfACard@gmail.com
Etsy Shop: The Power of a Card
https://karensliwinski.stampinup.net
https://ThePowerOfACard.blogspot.com
Images Copyright Stampin’ Up!®
Join my Facebook Group (The Power of a Cardmaker): https://www.facebook.com/groups/1042676296088278/?ref=share
My current host code for June is: BREWW3K9
Please use this for orders less than $150 and you’ll get a special treat from me.
For orders over $150, you qualify for host rewards from Stampin’ Up! (plus a treat from me!).


No comments:
Post a Comment