Have you checked out our kits from Stampin' Up! lately? There are so many of them now and with every new one, they just keep improving! Kits are a great way to start your card making journey. Some of them don't require stamping (like this kit), some of them are themed (examples are Christmas, birthday or thanks), some are aimed at kids or guys (so many people ask for help making masculine cards!) and some aren't even cards at all! Another new kit I just got is Wreath of Blooms ant this makes a lovely three dimensional flower wreath that I hung up at work. Kits come with everything you need to make your project, so they are also great to give as gifts.
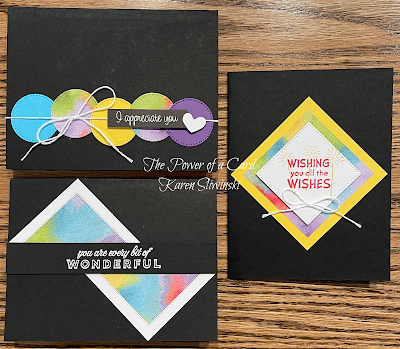
I've been a Paper Pumpkin subscriber for years and that means I get a "kit" every month. The difference is that it's always a surprise (although there are usually hints about the next month's kit inside). I like to say it's a fun card class that comes in the mail right to your door. With these kits, I often make variations of the cards to expand the contents, show my customers alternative layouts, or stretch my creative muscles. I did the same thing with this kit. I took the ingredients for three of the nine cards, added a few supplies of my own and made 11 different cards! I show all of them in my video and demonstrate how I made one of them.
I want to give a shout out to two people. The first is my best friend and team member Penny. She allowed me to use her kit so I could show you the unboxing of the kit in my video, which is great for you because it allows you to have the full kit experience. The second is another demonstrator, Rachel Tessman. She made some alternative cards and I show two cards with one of her ideas - just with different ribbon and sentiments. I twas such a great way to use the card base that I wanted to share it with all of you.
- Saying Thanks Card Kit
- Cardstock: Mango Melody 5-1/2" x 8-1/2"; Enjoy the Journey DSP 3-7/8" x 5",
- Adhesive and Tools
These next two sets are super easy. For the rainbow, I just trimmed the card front into two pieces and added the words. The rainbow dots one is super cute. By cutting the card base before you fold it into a 5-1/2 square, you can then cut that in half so you get a blank space to add a sentiment of your choice. By tying a ribbon around the scored line, you cover that up and nobody is the wiser.
Please give the kits a try! They are a great value (this one retails for only $13!), are quick and easy, and they come with all the supplies you'll need. And don't forget - there are a few more days left in Sale-a-bration! I believe they've added some additional choices and the Enjoy the Journey DSP is one of them!
Karen
ThePowerOfACard@gmail.com
Etsy Shop: The Power of a Card
https://karensliwinski.stampinup.net
https://ThePowerOfACard.blogspot.com
Images Copyright Stampin’ Up!®
Join my Facebook Group (The Power of a Cardmaker): https://www.facebook.com/groups/1042676296088278/?ref=share
My current host code for February is: WAJ9DXVY
Please use this for orders less than $150 and you’ll get a special treat from me.
For orders over $150, you qualify for host rewards from Stampin’ Up! (plus a treat from me!).


