I love using die cuts in my cards. I remember when Stampin' Up! first introduced die sets to match stamps - it was such a treat! Fussy cutting works, but having dies to cut out the images was the best thing since sliced bread! Today, many stamp sets have coordinating dies and I am hooked! In my Double Duty Die Cuts video, I show you how to use those die cut shapes twice, hence my choice of Double Duty Die Cuts as my title.
Gather your supplies:- Cardstock: Crumb Cake 8-1/2" x 5-1/2"; Soft Suede 3-1/8" x 4-3/8" and 7/8" x about 2"; Basic White 2-3/4" x 4", 3" x 2-1/2" and 3/4" x about 1-7/8"
- Stamp Bundle: Gorgeous Leaves
- Stamp Set: Flowers of Friendship
- Ink: Pumpkin Pie, Poppy Parade, Cajun Craze and Soft Suede
- Blending Brushes
- Artistry Blooms Sequins
- Adhesive and Tools
Cut out the large leaf die cut from the medium size piece of white. Position it on top of the large white layer - you will be using the die cut like a stencil. Use your blending brushes to add Pumpkin Pie, Poppy Parade and Cajun craze, blending the colors together to cover the die cut and some of the area around it.
Remove the leaf, add glue on the back and place on top of the base piece, rotated a little bit to be offset from the original placement.
Fold the card base in half and crease the fold with the bone folder. Using the small dots background stamp, stamp around the outside edge of the Soft Suede piece in Soft Suede Ink. This will give a nice texture to the paper and add interest to the mat. Adhere the leaf panel and then pop this up in the center of your card front with Dimensionals.
Stamp the sentiment onto the white strip with Soft Suede and trim to size. I like to use a strip for my sentiment rather than have the exact size pre-cut. This allows me to trim it as needed to make it centered, or stamp again on the other end in case you stamp crooked (like I did in the video). Add this piece onto the small strip of soft suede and trim to size. Add this to the bottom of the leaf with Dimensionals. Add some sequins to finish off the card.
I stamped a leaf in Soft Suede on the inside lower right corner and another in Pumpkin Pie on the envelope to complete my card. I really love how you can use the die cut as a stencil, and also use the colored die cut as a design element too. Now let me show you some other cards where one die cut is used to make two cards.
This first pair uses the Frosted Gingerbread Bundle and the Whimsey & Wonder DSP. I used my blending brushes to add Polished Pink over the bell die cut onto my label, then used the die cut on a second label. The Glittered Organdy ribbon adds a nice touch to the bells. I stamped the same sentiment on both labels and although the layout is slightly different, it has the same feel.
For my next set, I used the Merry Snowflakes Bundle. The three snowflakes were colored with Balmy Blue, Misty Moonlight and Night of Navy. I used my Stamparatus to stamp Season's Greetings onto the label. Then after positioning the colored die cut snowflakes on top of the second label, I stamped the sentiment again and it stamped perfectly over my snowflake die cuts. I used the dies to cut snowflake designs onto the white panel in the first card and the Wintry 3D embossing folder to emboss the half front of the second card.
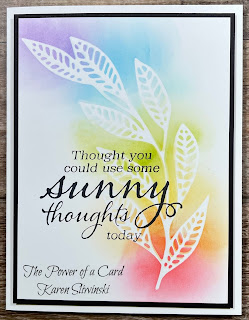
Lastly, I used the Artistic Dies to cut the large leaf sprig, to which I blended a rainbow of colors. This one was quite tricky because the die cut is large and rather floppy. If you had repositionable adhesive on the back of this die cut, it would be easier. Perhaps using post it notes to hold it in place as you blended the rainbow would help. I finished the card with the Sunny Sentiments and on the card with only the colored sprig, I added some Matte Black Dots for additional interest.
I hope you enjoyed seeing how to stretch your die cuts and get more out of them. I like being able to make two cards with one design element and I encourage you to give it a try!
Karen
ThePowerOfACard@gmail.com
Etsy Shop: The Power of a Card
https://karensliwinski.stampinup.net
Images Copyright Stampin’ Up!®
Join my Facebook Group (The Power of a Cardmaker): https://www.facebook.com/groups/1042676296088278/?ref=share
My current host code for October is: MGFRSYNY
Please use this for orders less than $150 and you’ll get a special treat from me.
For orders over $150, you will qualify for host rewards from Stampin’ Up! (plus a treat from me!).
Product List


No comments:
Post a Comment