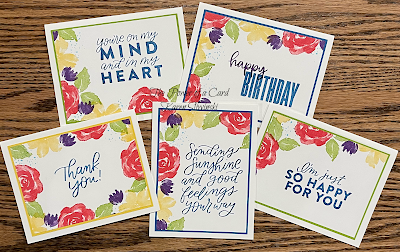
Sometimes we forget that we can create beautiful cards with only Stamps, Ink and Paper (SIP). My upline, Dena Rekow, showed me a way to make five cards at once and I thought I'd share this technique with you! It is a great way to make a set of cards to give as a gift, or to make lots of cards, perhaps for Christmas, quickly.
There are two ways you can prepare the full sheet of Very Vanilla for stamping - one is by using a ruler and making light pencil lines as shown in my diagram. You'll want a good eraser to remove them when you're done stamping. The other way is to cut the paper right from the beginning and use a little bit of tape to hold them together for stamping. I use this second method in my video, but feel free to do whichever method is easier or better for you. In either method, you'll end up with five card fronts that are 4-7/8" x 3-5/8" and just two small leftover scraps.
- Cardstock: Thick Very Vanilla 8-1/2" x 5-1/2"; Very Vanilla 8-1/2" x 11"; (5) Shaded Spruce 3-3/4" x 5"
- Stamps: Forever Fern, Biggest Wish, Good Feelings
- Ink: Granny Apple Green, Parakeet Party, Garden Green, Shaded Spruce
- Adhesive and Tools, including Scotch Tape and/or Pencil
When Dena demonstrated this technique, she used the Christmas Season stamp set - here is my version of what she did and my first set of five SIP cards. I used the Brightest Glow set for the sentiment. It was beneficial to make something nearly identical to hers to help me get the feel for this technique and I encourage you to use any of my samples to get you started too.
The next version I made features Watercolor Shapes. I used Fresh Freesia, Gorgeous Grape, Highland Heather, Polished Pink and Melon Mambo to make these dynamic geometric cards. I love how fun they turned out and think this could be done in so many color combinations!
My last set of cards has a whole different vibe because I used line art stamps and stamped them in black rather than colors. I didn't know if I would like this, but I loved it! You have to have images that are not directional and sometimes that is harder with line art sets. I love that it was so fast! No changing colors and actually, I only had to use three stamps from the Happiness Abounds stamp set to make these. To get my colors, I stamped the sentiment in bright colors and put them on the same colored card base. All of them were matted in Basic Black with really makes them pop.
Karen
ThePowerOfACard@gmail.com
Etsy Shop: The Power of a Card
https://karensliwinski.stampinup.net
https://ThePowerOfACard.blogspot.com
Images Copyright Stampin’ Up!®
Join my Facebook Group (The Power of a Cardmaker): https://www.facebook.com/groups/1042676296088278/?ref=share
My current host code for December is: ZDXDKWED
Please use this for orders less than $150 and you’ll get a special treat from me.
For orders over $150, you qualify for host rewards from Stampin’ Up! (plus a treat from me!).
Product List


No comments:
Post a Comment