Tuesday, July 11, 2023

Flip Out Fun Fold

I have to admit, this is such a fabulous fun fold, that it has become one of my favorites to make!  I have to thank Kelly Acheson for showing this layout - it's fantastic! As with many fun folds, it may look difficult to make, but let me assure you, it isn't!  The key thing that will allow you to easily make this card is dies in nesting sizes (like the Stylish Shapes which has both squares and circles).  I do have an example with another die set that I think you'll love too.  Let's get started with the fun!


Gather your supplies:

  • Cardstock:  Basic Black 8-1/2" x 5-1/2" and 5" x 8"; Basic White 1-7/8" x 4-7/8", 2-1/2" x 2-1/2", and 1" x 3", Zoo Crew DSP 4" x 5-1/4" and an animal cut out with dies or fussy cutting, Bright & Beautiful 6" DSP 1-7/8" x 4-7/8"
  • Stamp Set:  Zany Zoo
  • Dies: Stylish Shapes 
  • Ink:  Memento Black and Lemon Lime Twist
  • Stampin' Blends:  Dark Lemon Lime Twist
  • Other:  Pool Party Grosgrain 4-1/2"
  • Adhesive and Tools
Begin by folding the card base in half and creasing with the bone folder.  Adhere the DSP to the front of the panel but keep your adhesive primarily to the outside edges.  The reason for this is when we cut out the hole in the card front, you can then use both pieces individually if they aren't glued together!


Cut out your animal from the DSP - there are six themes of critters - celebration (which is the sheet I used for my samples), on the go, outdoors, music, hobbies and dancing.  Some of them can be cut with the coordinating dies, but most are pretty easy to fussy cut.  Depending on the size of the animal you choose, select two sizes of squares from the Stylish Shapes - the first one needs to be just about big enough to fit your animal and the second one is the next size larger.  

Take the larger of the squares and place that on the front of the card (where you have already adhered the DSP).  I like the look of the square on point, but you can choose to have it parallel with the card sides too.  With the card open, cut out the square - the cut out pieces won't be used today, but can be saved for another project.  Also cut out the smaller square in Basic White.


For my sentiment, I wanted to use the shorter thick banner, but it was a little too short for the saying.  There is a simple fix to make it longer (or shorter if you ever need that option).  I show this in the video - place the die on the strip of cardstock and then place the top plate so that it does not cover one end and run it through the Stampin' Cut & Emboss machine.  Then place the die back on the paper to the length you need.  The dots in the die will help you align it perfectly.  This time, put the cover plate on the other end and leave the already cut edge uncovered.  Partial die cutting is a great technique to use when card making as it will make your dies way more versatile!


Let's assemble the front.  With my sentiment, I wanted to add a ribbon, but didn't want to use Pool Party for this particular animal (I used it in my first sample because it matched my koala).  Easy fix - use the dark Lemon Lime Twist Stampin' Blend to color the ribbon!  I always think to color white ribbon, but sometimes forget that I can color other colored ribbons too!  The ribbon will take a few minutes to dry, but when it is, adhere it to the back of the sentiment strip with Seal.  Trim the ends of the ribbon and pop up the unit to the bottom front of the card. Lastly, adhere the animal to the white die cut square and set this aside.

Time to make the magic happen!  Take the 5" x 8" piece of Basic Black and score it at 2", 4" and 6" along the short side.  Starting on the right side, fold to the right, then left and left again.  This may sound confusing but if you watch the video, it's not.  This will be the mechanism that makes the flip out portion of the card.  The outside flaps are the only parts that get adhered to the card - one to the interior right side and the other to the interior left side.  I have found it helpful to trim a tiny bit off the left most side so it fits better with the crease of the card.  The one thing to be mindful of is the opening on the front of the card - you don't want any adhesive to be visible through the opening.  Note - the card will be totally flat when closed.

Let's add the finishing touches - stamp the Happy Birthday sentiment and musical notes on the white rectangle and adhere to the right most flap.  Adhere the DSP to the next flap.  Lastly, close the card and add the square with the animal to the right side only (this is very important!) of the flap that is visible through the opening.  This will allow the animal to flip out when the card is opened.  How adorable is that??


Once you make your first card, it won't seem complicated at all - trust me!  I had fun using different dies to make my cards.  This next card uses the Stylish Shapes again, but this time with circles.  I used the Stargazing DSP, the Holographic Trip Specialty Paper, Reach for the Stars Bundle (all of those are part of the Stargazing Collection, found on page 87-87 in the annual catalog) with Berry Burst cardstock to make this fabulous card.  I love it!


For my next card, I used Countryside Corners dies, Soft Shimmer Paper Combo Pack, Masterfully Made DSP, Textured Floral Bundle, Charming Sentiments, Sentiment Silhouettes dies and Lost Lagoon cardstock.  The shimmer is subtle and classy and looks fabulous with the DSP.  The Countryside Corners are particularly great for this fun fold because there are so many sizes that nest, giving lots of possibilities!


The Share a Milkshake Bundle is one of my favorite sets.  I chose the Something Fancy Dies to make my cutout and Glorious Gingham 6" DSP, Bubble Bath cardstock (embossed with the Basics 3D embossing folders) and Basic White for the rest of the card.  I stamped with Berry Burst, Bubble Bath and Smoky Slate and added a knot with the Sheer Ribbon Combo Pack.  Because my card base was white, I didn't have to add another rectangle to the inside like I did with the darker cards above.


For my last sample, I didn't use nesting dies, but instead used the Irresistible Blooms Bundle.  After adhering the Hello, Irresistible 6" DSP panel to the front to the card (unlike the previous cards, I made sure to place glue all over the panel so I'd have good adherence to the small parts of the die), I cut out the large opening.  I used the dies to cut a large and small flower from one of the papers.  Before gluing the flower to the panel, I tucked in two leaves.  These have to be on the inside panel so they will be under the opening when the card is closed.  The last leaf can be adhered to the flower so that it is on top of the opening.  I used the small flower for the inside of my card and stamped my sentiment with Calypso Coral.


I love all my cards and hope you do too!  When you make one of your own, please share it on my Facebook group page - I'd love to see what you create!

Karen


ThePowerOfACard@gmail.com

Etsy Shop: The Power of a Card

https://karensliwinski.stampinup.net 

https://ThePowerOfACard.blogspot.com

Images Copyright Stampin’ Up!®


Join my Facebook Group (The Power of a Cardmaker):  https://www.facebook.com/groups/1042676296088278/?ref=share


My current host code for July is: 24TNVVEG

Please use this for orders less than $150 and you’ll get a special treat from me.

For orders over $150, you qualify for host rewards from Stampin’ Up! (plus a treat from me!).


Product List

Tuesday, June 27, 2023

Aluminum Foil Meets Embossing Folders!

This is a fun technique that I've done many times over the years, mainly when embossing folders remind me of metal plates like you find on a truck or tool chest.  I will show you how to emboss aluminum foil to make a gorgeous decorative element for your cards.  In my video, I use regular weight foil and adhere it to a piece of cardstock first, but you can use heavy weight foil all on its own.

The first card I show in the intro was made by cutting a deckled rectangle after adhering the foil but before embossing (and using a deckled rectangle for the sentiment), but I will demonstrate my preferred method.  This is to adhere, emboss and then fold the excess foil to the back side of the piece.  This help prevent foil from lifting up on the edges if there isn't glue in a portion of it.  So grab your Reynolds Wrap and let's make some cards!

Gather your supplies:

  • Cardstock:  Smoky Slate 8-1/2" x 5-1/2" and 3/4" x 5-1/2"; Basic White 3-3/4" x 5"and 1-3/4" x 3" 
  • Stamp Set:  Phrases for All
  • Ink:  Azure Afternoon
  • Embossing Folder:  Quatrefoil Tiles
  • Other:  Sheer Ribbon Combo Pack
  • Aluminum Foil
  • Adhesive and Tools
Start by cutting a piece of foil just a little larger than the large white rectangle.  Add small lines of glue all over the cardstock, trying to get good coverage, but only small amounts of glue.  Place this piece on the back side of the foil and press all over the cardstock to get excellent adhesion.  Place this piece in the embossing folder and emboss with the Stampin' Cut & Emboss machine.

I really like to fold the extra foil to the back side of my piece as I demonstrate.  This will prevent any foil from lifting up at the edge if there isn't total glue coverage.  The easiest way I found to do this is to hold the piece almost vertical and just fold down.  Make sure the corners are tucked in so they don't stick out after folding.  Adhere this piece to the front of your card base.

Stamp the sentiment with Azure Afternoon ink on the small white rectangle and add this to the card with Stampin' Dimensionals.  I placed it off center because of the bow.  Tie a bow with the Azure Afternoon ribbon and adhere to the upper left corner with a Mini Glue Dot.

To finish up the card, emboss the strip of Smoky Slate with the same embossing folder and place on the inside bottom.  It looks really nice to emboss the envelope flap with the same folder - it also adds continuity.  


When I was first making cards for this video, I started with the obvious embossing folder - Metal Plate.  I used the Zany Zoo stamp set and the Radiating Stitches Dies for this adorable birthday card.  I like how the Pebbled Path and Sweet Sorbet cardstock look with the embossed foil.


Next I used the Basics 3D folder (in my favorite cross hatch design) and the Hello Ladybug stamp set for a cheerful Hello card.  Not only is this a cute layout, it's a great way to use up scraps of paper.  You don't have to use Basic white because the foil covers it entirely, so why not use up all of your old paper?


My next card features the Merry Melody 3D embossing folder and the Zoo Crew DSP.  I matted the three musicians in black and added a stitched circle with musical notes to complete my lyrical birthday card.  I love the Lemon Lime Twist card base as it really makes the frog pop!


For the next sample, I adhered my foil to a square of cardstock, then cut a circle using the Stylish Shapes dies.  Then, I embossed the circle with the Basics 3D folder.  When handling this piece, just be careful not to catch the edge where the foil might try to lift up since we aren't folding it over.  I used Bubble Bath as my base and then coordinated with Moody Mauve for this birthday celebration.  


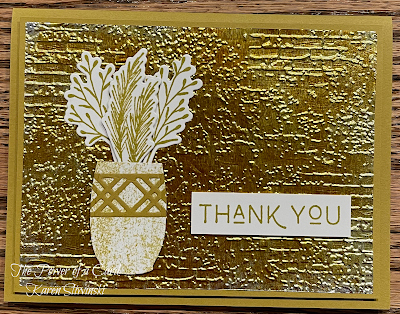
Lastly, I added some extra touches by using my Stazon ink pads.  For the first one, I embossed the panel with the Timeworn Type 3D folder.  Then I lightly ran the ink pad over the raised portions, which left touches of black.  A few strips of white set the embossed piece off nicely and the crocodile (or is it an alligator?) looks fabulous on the black card base.  On the second card, I liberally applied ink over the embossed piece (Exposed Brick 3D) with the saddle brown ink pad.  This took hours to fully dry, so you need lots of patience.  However, the result is a beautiful antique gold look that paired very well with Wild Wheat cardstock and the Earthen Textures bundle.


I hope you've enjoyed using an everyday household item to spice up your cards.  We have so many great embossing folders in the catalog and on-line - give them a try!

Karen


ThePowerOfACard@gmail.com

Etsy Shop: The Power of a Card

https://karensliwinski.stampinup.net 

https://ThePowerOfACard.blogspot.com

Images Copyright Stampin’ Up!®


Join my Facebook Group (The Power of a Cardmaker):  https://www.facebook.com/groups/1042676296088278/?ref=share


My current host code for June is: BREWW3K9
Please use this for orders less than $150 and you’ll get a special treat from me.
For orders over $150, you qualify for host rewards from Stampin’ Up! (plus a treat from me!).

Product List 

Tuesday, June 13, 2023

Doodles for Card Makers

Doodles are fun and simple additions to your cards and they allow you to add a personal touch that is all your own!  In my video, I show a variety of cards where I added doodles - everything from simple lines to a rainbow of dashes to a leaf covered background.  All you need are some basic tools to do the markings - things you probably already own - Stampin' Write Markers, Stampin' Blends and Watercolor Pencils.

I used to do a lot of doodling years ago when I started scrapbooking in the early 90's.  Back then, I used to do some elaborate doodles to spruce up my pages.  The same concept can apply to your cards - just on a smaller scale.  Today, Zentangles are quite popular and if you search for images of these, you will find a wonderful source of inspiration.   

Today's video will be a little different in that I am not making a card, but am showing you a bunch of cards where I doodled to enhance my design or layout.  After I show the card, I explain how I did the doodle and for many of them, I demonstrate it on a scrap of paper.  All of my cards are basic layouts so I wanted to focus my time on the doodles and show you more of that aspect.

Gather your supplies:

  • Writing tools such as Stampin' Write Markers, Watercolor Pencils and Stampin' Blends
  • Pencil and eraser (helpful but not required)
  • Beveled edge ruler or drafting ruler
  • All the normal card making supplies you normally use


The first card uses a doodle as a frame for a simple die cut element.  Here, I drew wavy lines from one corner to the next, about 1/4" in from the edge.  Then I drew another line, curving in the opposite direction and criss crossing.  Do this on all four sides to complete the framing effect..  For this card, I used the Bright & Beautiful DSP, Basic Black and Basic White cardstock, the Wonderful Thoughts Bundle and the Sheer Ribbon Combo Pack.


This lovely thank you card features the Irresistible Blooms Bundle, the Bright & Beautiful DSP, Berry Burst and Basic White cardstock, vellum, Meadow Dies and Iridescent Pearls.  After assembling my flowers and leaves and stamping my sentiment in Berry Burst ink, I used my Lemon Lime Twist Stampin' Write marker to add a border - leaving a gap between my line and the elements that crossed where I was drawing.  Sometimes I got too close to my leaves, but that's ok too.  I added some pearls to the corners - this is optional.  They looked OK without them, but not perfect.  I really like how the border and the sentiment intersect.


The Brights DSP pack, along with cardstock in Basic Black, Basic White and Pumpkin Pie pair so well in this simple birthday card.  The sentiment is from Pansy Patch and the doodle is similar to the first one, except that I didn't go all the way around the Stylish Shapes square die and I did loops rather than intersecting wavy lines.  I would recommend practicing your loops - don't think too hard and let your hand flow freely with loopy lines.  If you think too much, your doodle might become stiff and lose it's fluidity (speaking from experience here!).


I just love the Wanted to Say dies, which I used here in Moody Mauve.  A simple rectangle with the word Celebrate is dressed up by doing a series of dots and dashes using my ruler.  A single flower (Season of Chic Bundle and the 23-25 In Color Dots) looks fabulous on the background piece that was embossed with the Basics 3D embossing folders.  I really like how this doodle looked on the bottom of the inside card layer too.


This next doodle is one of my favorites I learned from my markings lesson in the watercolor stamp camp I took earlier this year.  The design is slightly wavy lines with dots added to alternating sides of the lines.  Some of them cross each other, while others do not.  I used Basic White, Basic Black and Real Red cardstock, along with the Dots & Spots, Tailor Made Tags and Wanted to Say dies.  The ribbon is from the Real Red & Burlap Combo Pack and the inside sentiment is from Good Feelings.  

I love the sentiment "Sending sunshine & rainbows" from Kindest Expressions and felt that this needed some rainbow doodles!  I drew some pencil lines as a guide for my colors, then used my Stampin' Write Markers to make vertical lines in each of six colors along the arc.  After erasing the pencil lines, I matted it in Basic Black, added the Gingham ribbon and put it on a Daffodil Delight base.  The resulting look is delicate, but could be made bolder by using Stampin' Blends instead of Stampin' Write Markers.  The inside sentiment is from In the Moment.  Which one do you like better?


Branching out a little more, this next card uses Stampin' Blends to essentially make DSP!  I used Lemon Lolly, Bubble Bath and Fresh Freesia to draw circles of color on a Basic White rectangle.  Then I used my Basic Black Stampin' Blend to turn those circles into flowers.  For Fresh Freesia, I added big loopy petals that extended well behind the circle.  The Lemon Lolly flowers have a circle center and petals that stay within the color boundary and the Bubble Bath "roses" are made with a bunch of C shapes expanding out from the center.  I used sentiments from Irresistible Blooms and Biggest Wish and the tag is from Something Fancy dies.


My last card uses more paper from the Bright & Beautiful DSP pack (which I love as you might guess and is part of our June DSP paper sale).  I drew sprigs of leaves using Watercolor Pencils.  While these may look hard to do, they really aren't!  A simple sentiment stamped in Lemon Lime Twist from Season of Chic on a Stylish Shapes banner look great on the leafy background.  I matted it in Granny Apple Green and added it to a Crumb Cake base.  Instead of a sentiment for the inside, I drew some more leaves on a Basic White strip and added that at the bottom.  

So what do you think?  Ready to try doing some doodles yourself?  You've got what it takes - just give it a go!

Karen


ThePowerOfACard@gmail.com

Etsy Shop: The Power of a Card

https://karensliwinski.stampinup.net 

https://ThePowerOfACard.blogspot.com

Images Copyright Stampin’ Up!®


Join my Facebook Group (The Power of a Cardmaker):  https://www.facebook.com/groups/1042676296088278/?ref=share


My current host code for June is: BREWW3K9

Please use this for orders less than $150 and you’ll get a special treat from me.

For orders over $150, you qualify for host rewards from Stampin’ Up! (plus a treat from me!).


Product List
Basic Black Stampin' Write Marker
$3.00
2023–2025 In Color Stampin' Write Markers
$17.50
Basic Black Stampin' Blends Combo Pack
$10.00
Melon Mambo Stampin' Blends Combo Pack
$10.00
Watercolor Pencils Assortment 1
$16.00

Christmas Cards in Unexpected Colorways

I love Christmas.  I love making Christmas cards.  I love decorating for Christmas.  And I loved making this video for you!  (Please note, ...