It is always so exciting when a new catalog is released! I totally loved it when I was a customer and I think I love it even more as a demonstrator. There are always so many new products I want (which is an excellent reason to become a demonstrator because the discount allows you to get more for less). So where do you start when there are so many wonderful new items to choose from?
When I saw the preview of our new annual catalog, there was one bundle that intrigued me. It wasn't because it was adorable, or had the perfect sentiment - it was because I thought it would be versatile, yet intimidating to many of my customers! If you've seen my videos, especially ones that feature dies, you'll know I like to show lots of ways to use them. My hope is to inspire you to greater creativity and make the products we offer more valuable because they aren't a single function item. Click to watch the video.What's so different about this bundle? Well first of all, there is only one stamp set, but seven dies. Secondly, it has no sentiments, but pairs beautifully with almost any sentiment stamp you may have. Thirdly, the dies are nesting in size, but can be used in groups or individually. Have I piqued your interest? I want to begin with some tips that will help you with both the stamp and the dies.
Before I show the cards I made with this bundle, I want to talk a little about the stamp. It is large (like many of our background stamps) and can difficult to handle. I used the F block, the biggest block I own. It's big and a bit unwieldily to handle. Another option is the Stamparatus (which has been discontinued but many of you own). This works great! But what if you don't have either? You can still use this stamp! Simply turn it upside down, ink it up and place your paper on top and press gently (another smaller block is perfect to glide over the paper and give a good impression). Lift the paper straight up (don't slide it off or it will smear).
My next helpful tip is with the dies. Stamp the image onto a piece of copier paper. Ideally, you have a magnetic sheet (I use these to store my dies) to place the stamped image on. Next, place each die on top, cutting side down, to perfectly align with the stamped image. The magnet will hold it in place until you have all six nesting octagonal shapes in position. Then take a six inch piece of low tack tape and stick it to your clothing to reduce the stickiness a little more. Then place the tape across the middle of all the dies. This will allow you to pick them up all together and stamp all of them at once without having to align them each time!
Next, I used just a single frame in Poppy Parade I added sentients and flowers cut from the Sending Smiles stamp set and dies. The result is very striking and I think the thin frame is the perfect addition for this card.
Then I had lots of fun laying the rainbow shapes onto a white card base. They remind me a little of the rapid transit maps of DC when my daughter used to live there and we would go all over the city. The hardest part of this card was deciding which piece would go under and which would go over the next color! I found that if you start with tacking down just a little part of the biggest piece and using post it notes, it was not too difficult to make little snips to slide a portion under another section. I used the smallest piece for my birthday greeting (from Best Family Ever).
My next card is what I'd say is the more traditional use of the dies - just to make a backdrop to some stunning flowers and simple sentiment. I used Daffodil Delight and Granny Apple Green to go with my daisies that were embossed in white on Fluid 100 Watercolor paper and colored with water painters. I spritzed the yellow piece before adding the flowers and greenery on top.
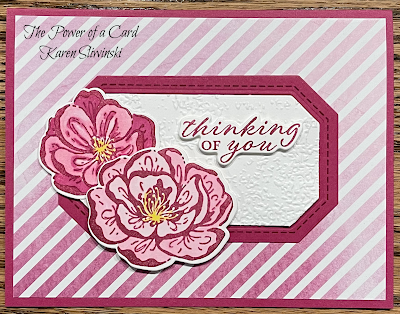
This next card uses the wonderful Bright & Beautiful 6" DSP paper and the Irresistible Blooms Bundle. For this one, I stamped Berry Burst on Berry Burst cardstock for a more subtle look. Then, I added a smaller white shape which I embossed with the Timeworn Type embossing folder and popped up. These two together made the perfect place to hold those beautiful flowers and sentiment (from the Wonderful Thoughts Bundle).
Lastly, I went back to the Bright & Beautiful DSP where I took off the largest of the die cut shapes from my taped grouping and cut if from the middle of a 4" x 5-1/4" piece. After adhering this piece to my Bubble Bath card base, I added the rings, popping up each alternate ring. For the center piece, I stamped Celebrate! from the Share a Milkshake set and popped this up with double dimensionals. This card is so simple to make, but looks so cool!
I sure hope you have enjoyed this video and that you will add this bundle to your next order. If you need a catalog, let me know - there are lots of awesome (and cute and sentimental and funny) products there for you to adore! Happy Stamping!
Karen
ThePowerOfACard@gmail.com
Etsy Shop: The Power of a Card
https://karensliwinski.stampinup.net
https://ThePowerOfACard.blogspot.com
Images Copyright Stampin’ Up!®
Join my Facebook Group (The Power of a Cardmaker): https://www.facebook.com/groups/1042676296088278/?ref=share
My current host code for May is: 4HDWHNYYPlease use this for orders less than $150 and you’ll get a special treat from me.For orders over $150, you qualify for host rewards from Stampin’ Up!and a treat from me!
Product List


No comments:
Post a Comment