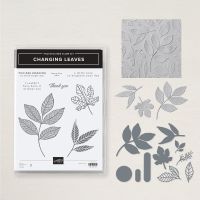
As part of the On-line Exclusives released this month, the Changing Leaves Bundle is a great three part bundle. The stamp set has 8 stamps, the dies cut out 10 shapes and there is a hybrid embossing folder that is simply stunning. While the name of this bundle makes you think of autumn, you'll see that I've got many cards that aren't fall at all. Here is a chart that shows the stamps and dies:
In case you haven't used a hybrid embossing folder before - it is an embossing folder that holds dies so you can cut and emboss at the same time. The dies cut out three of the gorgeous leaves, but can be used to cut out stamped images too. Of course, the embossing folder can be used without the dies and honestly, I'm not sure which side is nicer - the embossed or debossed side! I have examples using both in my
video. This photo shows the embossed side and my first card will show the debossed side.
Gather your supplies:- Cardstock: Shy Shamrock 8-1/2" x 5-1/2"; Basic White 4-1/2" x 5-1/4", 4" x 5-1/4", 1" x 4"
- Stamp Bundle: Changing Leaves
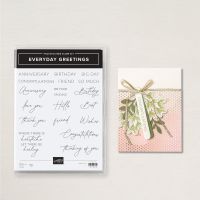
- Stamp Set: Everyday Greetings - used in many of my samples
- Ink: Shy Shamrock
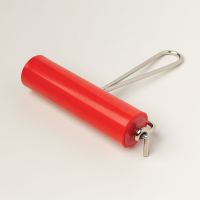
- Adhesive and Tools, including the Stampin' Brayer
I haven't used the brayer in a video before, so there are a few helpful tips when using it. First of all, there are little "feet" on each end. When inking the roller, have the feet facing up and when resting the inked brayer on your table, turn the feet down to hold the inky roller off the surface. As you ink the roller, don't go back and forth on the ink pad, but rather roll, lift, roll again, and repeat until you have good coverage on the roller.
For our card, emboss the larger Basic White rectangle. Ink the brayer with Shy Shamrock and roll it over the debossed side of the panel. You will get uneven coverage (part of the charm of using the brayer) and ink will mostly cover the area surrounding the leaves, as well as a little of the texture on the leaves. Trim this panel down to 4" wide and save the 1/2" piece for the inside of the card. To clean the brayer, just run it under the faucet.
Stamp the sentiment on the 1" strip of Basic White. I use a longer piece of white and then center it on my embossed panel before trimming. Adhere the embossed panel to the card base, which has been folded in half and creased with the bone folder. Pop up the sentiment strip towards the bottom. Add the 1/2" embossed strip on the other Basic White panel and add to the inside of the card. I chose not to add a sentiment at this time to make this card more versatile. I can always add one later when I know the specific event for which I'm offering congratulations. To complete the card, stamp one of the leaves onto the envelope. Both of my samples were monochromatic, but you could certainly adapt this card to use several colors.
So as I started to play with this bundle, I went right into the traditional fall color scheme. I started with a piece of Fluid 100 Watercolor paper (wider than the 4" width so I could cut off a strip for the inside) and my Water Painters. I used the ink from the lids of the ink pads to color each leaf/stem, using Daffodil Delight, Granny Apple Green, Lemon Lime Twist, Poppy Parade, Real Red and Pumpkin Pie. For the background, I used Pecan Pie to give an uneven shading and make the leaves pop. When everything was dry, I spritzed with Poppy Parade and Pecan Pie. I used Linen Thread to tie around the leaves before mounting the sentiment label. For the inside, I added the cut off strip of leaves and stamped a Thank You sentiment. On the envelope, I added a die cut leaf that was cut from watercolor paper and inked in the same leaf colors as the card front.
This next sample is simply elegant - gold and white. I used the Nature's Sweetness Specialty DSP for the three panels of gold in the background. the large leaf is the focal point of the card and the addition of a gold bow (Simply Elegant Trim - retired) and the little label, embossed in gold are all you need to add. I embossed leaves on the inside and on the envelope. While this one is aimed at encouragement, it could easily become a gorgeous wedding card!
This card uses the debossed side of the embossing folder for the background piece of Basic Beige. I used Misty Moonlight to cut out the leaf and mounted that with the embossed side up - I like the look of seeing both versions at the same time. The Night of Navy & Gold Glittered Ribbon added behind the sentiment add just a touch of bling. For the inside, I embossed just the top inch of the Basic White insert and then added a small strip of Misty Moonlight where the embossing and plain part meet. I also embossed the flap of the envelope. In case you don't know how to do that, here is a short
video showing you how.
I love the freshness of this card - the large leaf was stamped with Granny Apple Green and Lemon Lime Twist and mounted on Garden Green. The Sentiment is accented with a small solid die cut leaf and the ribbon is the Iridescent Striped Trim. I stamped the large leaves on the envelope flap too - I just love this look!
My next card is a total departure - no leaves at all! It does use the long rounded label die, but not for a sentiment! I used a sheet of paper from the Full of Life 6" x 6" DSP pack and cut out seven labels as the colors merged from yellow to pink. I then staggered them across the front of my card and placed a 1/2" strip across the entire front with my simple sentiment. What else do you need? Both the envelope flap and inside use up the remaining piece of the DSP - very efficient indeed!
For the last example, I went back to watercolor paper. After misting the paper with water, I stamped the maple leaf in Pumpkin Pie, Berry Burst and Blackberry Bliss. If your colors don't bleed very much, you may need to mist to add more water. If they bleed too much, you may need to stamp again after it's mostly dry, then add a tiny bit more mist. I love how these colors blend together! You will need to allow this into dry completely before adding it to the Crumb Cake base. To complete the front, I used sponge daubers to add the three colors onto the stamp, then cut out three sprigs to add behind the trim-color leaf. I stamped Thank You in Pumpkin Pie, but didn't want the label to be so long, so I shortened it. Here is a quick
video that shows you how to shorten or lengthen a die cut label. I stamped more leaves on the inside, added another sentiment and finished the card by stamping more leaves on the envelope flap. I do believe this was my favorite card - what is yours?
For those of us who live in North America, we are just in the middle of summer. I'm not ready for fall just yet, but I hope this bundle will inspire you to get Changing Leaves and use it now and into the cooler autumn days ahead!
My current host code for July is: TMEASKYN.
Please use this for orders less than $150 and you’ll get a special treat from me.
For orders over $150, you qualify for host rewards from Stampin’ Up! (plus a treat from me!).
Product List







No comments:
Post a Comment